Content Delivery > CDN > Console User Guide
This document describes how CDN service is configured and applied on NHN Cloud CDN console.
Creating CDN Service
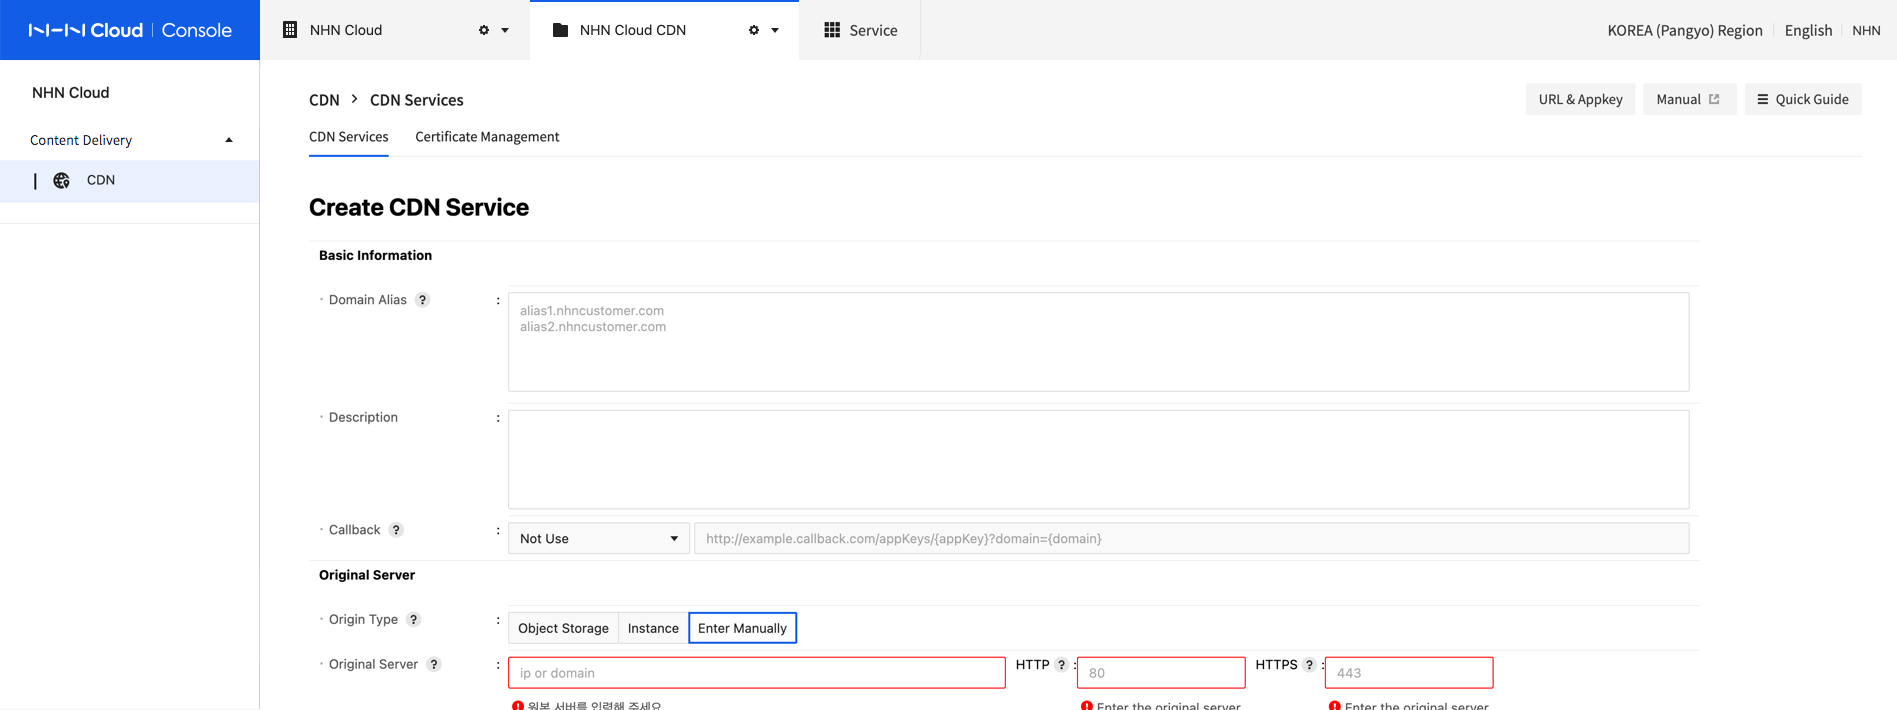
Go to Content Delivery > CDN and to CDN Service and click Create, and the Creating CDN window pops up. CDN service domain is automatically created in the [ServiceID].toastcdn.net format. To use your own domain, enable Domain Alias. It takes up to 2 hours to complete deployment after service is requested for creation. Service becomes available after it is completely deployed.
[Note] Duration for download optimization when creating a CDN for the first time Download speed might become slightly slower for up to 3 days after CDN is first created.
Basic Information
Set basic information.
-
Service Region GLOBAL service is provided via CDN edge servers located around the globe. Note, however, China and Russia are excluded from service regions.
-
Description More description is added on CDN service.
-
Domain Alias The default service domain address of NHN Cloud CDN is provided in the [ServiceID].toastcdn.net format. To use CDN service with your own domain, enable Domain Alias. To use HTTPS protocol with your own domain, get a certificate issued from Certificate Management and set domain alias. After domain alias is set, register CNAME record at DNS provider of domain, like follows. Please consult your DNS provider regarding DNS settings.
- Record Type: CNAME
- Record Name: [Registered domain for domain alias]
- Record Value (Rdata): [ServiceID].toastcdn.net
- TTL: Randomly selected
-
Callback It takes hours to create and change CDN service. (e.g. Modify, Suspend/Resume, and Delete). After a task is completed, enable the callback setting to receive change status via callback URL and CDN setting information. See API Guide to find information sent to callback.
- Enter HTTP Method and Callback URL.
- To receive results on the change of CDN via query parameter, include the following path variable to Callback URL. e.g.: http://callback.url?appKey={appKey}&status={status}&isSuccessful={isSuccessful})
| Path Variables | Description | Delivered Value |
|---|---|---|
| {appKey} | Appkey of CDN Service | Appkey issued on console |
| {domain} | Name of CDN Service | [ServiceID].toastcdn.net |
| {status} | Current status of CDN | OPEN, SUSPEND, CLOSE, ERROR |
| {isSuccessful} | Whether service change is successful (API v1.0 is not supported.) | "true" or "false" |
Origin Server
Set server providing original files to be deployed to CDN.
-
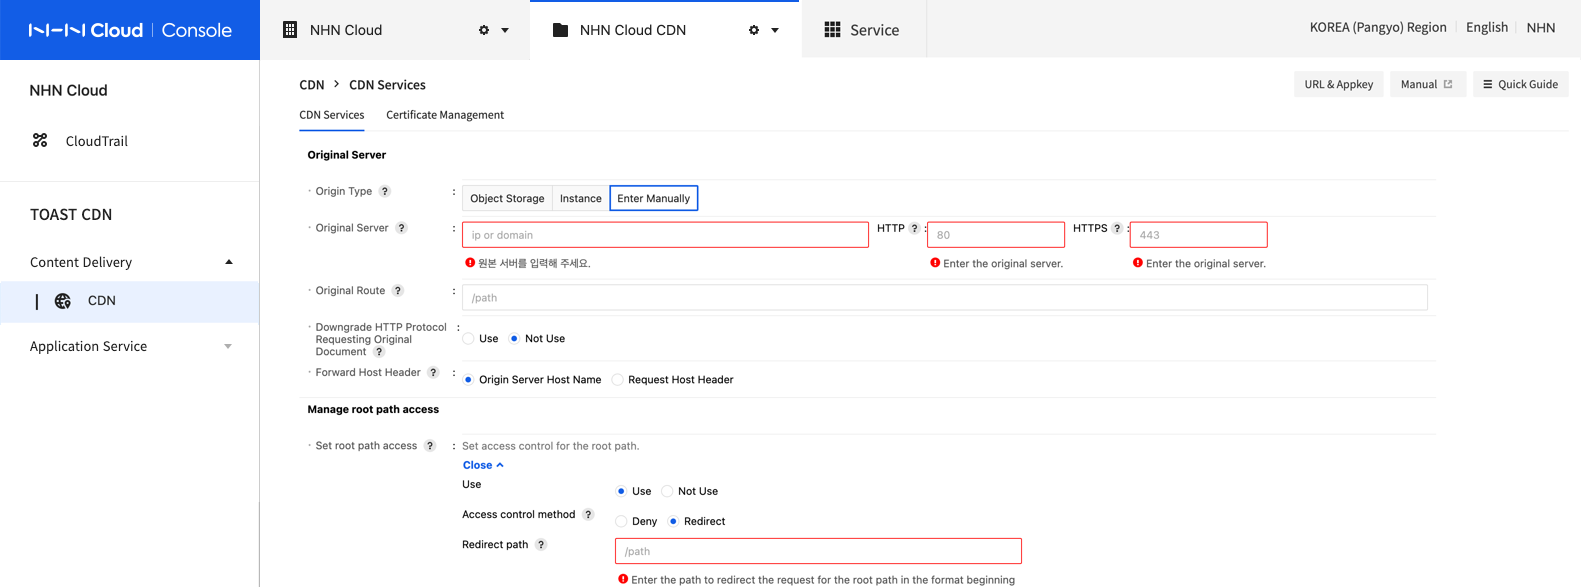
Origin Type
- Object storage: Set the container created in the NHN Cloud Object Storage service as the origin server.
- Region: Select a region to query object storage container information.
- Name: Enter the name of the container you want to set as the origin server. Only containers with a container access policy of PUBLIC can be used as the origin server. If the container can be used as the origin server, the container information is automatically entered in the origin server and origin path.
- Instance: Set the instance created in the NHN Cloud Instance service as the origin server.
- Region: Select a region to retrieve a list of instances.
- Instance: From the list of retrieved instances from the selected region, select an instance to set as the origin server. The IP of the selected instance is automatically entered in the origin server, and the port of the origin server to be used must be entered manually. Only instances that are associated with floating IPs can be used as the origin server.
- Enter Manually: Configure a separate running origin server.
- Object storage: Set the container created in the NHN Cloud Object Storage service as the origin server.
-
Origin Server The origin server is the server that provides original files to be distributed by the CDN service. The origin server can be entered in IPv4 or fully qualified domain name (FQDN) format. It is recommended to set the server as a domain because an IP address is likely to change. If there is no running origin server, select the Instance option in Original Type to use an instance of the NHN Cloud Instance service, or select the Object Storage option to use a container in the NHN Cloud Object Storage service. To support secure transport (HTTPS) via the CDN service domain, the origin server must support HTTPS response. This means that the origin server must have a certificate trusted by NHN Cloud CDN installed. Refer to the following table for trusted certificates. If the origin server cannot support HTTPS response, use the Downgrading HTTP Protocols Requesting Originals setting. However, Downgrading HTTP Protocols Requesting Originals has constraints, so it is recommended that the origin server support HTTPS protocol.
[Table 1] List of Trusted Certificates
| Common Name | Expiration Date | SHA-1 Fingerprint |
|---|---|---|
| SecureTrust CA | 1.Jan.30 | 8782c6c304353bcfd29692d2593e7d44d934ff11 |
| Entrust.net Certification Authority (2048) | 24.Jul.29 | 503006091d97d4f5ae39f7cbe7927d7d652d3431 |
| DigiCert Global Root CA | 10.Nov.31 | a8985d3a65e5e5c4b2d7d66d40c6dd2fb19c5436 |
| 30.Sep.23 | 36b12b49f9819ed74c9ebc380fc6568f5dacb2f7 | |
| QuoVadis Root CA 2 G3 | 13.Jan.42 | 093c61f38b8bdc7d55df7538020500e125f5c836 |
| thawte Primary Root CA | 17.Jul.36 | 91c6d6ee3e8ac86384e548c299295c756c817b81 |
| Go Daddy Root Certificate Authority - G2 | 1.Jan.38 | 47beabc922eae80e78783462a79f45c254fde68b |
| GeoTrust Primary Certification Authority | 17.Jul.36 | 323c118e1bf7b8b65254e2e2100dd6029037f096 |
| VeriSign Class 3 Public Primary Certification Authority - G4 | 19.Jan.38 | 22d5d8df8f0231d18df79db7cf8a2d64c93f6c3a |
| Entrust Root Certification Authority | 28.Nov.26 | b31eb1b740e36c8402dadc37d44df5d4674952f9 |
| 29.May.29 | 5f3b8cf2f810b37d78b4ceec1919c37334b9c774 | |
| AffirmTrust Commercial | 31.Dec.30 | f9b5b632455f9cbeec575f80dce96e2cc7b278b7 |
| Amazon Root CA 4 | 26.May.40 | f6108407d6f8bb67980cc2e244c2ebae1cef63be |
| Certum CA | 11.Jun.27 | 6252dc40f71143a22fde9ef7348e064251b18118 |
| DST Root CA X3 | 30.Sep.21 | dac9024f54d8f6df94935fb1732638ca6ad77c13 |
| TC TrustCenter Class 2 CA II | 1.Jan.26 | ae5083ed7cf45cbc8f61c621fe685d794221156e |
| SwissSign Gold CA - G2 | 25.Oct.36 | d8c5388ab7301b1b6ed47ae645253a6f9f1a2761 |
| USERTrust ECC Certification Authority | 19.Jan.38 | d1cbca5db2d52a7f693b674de5f05a1d0c957df0 |
| QuoVadis Root CA 2 | 25.Nov.31 | ca3afbcf1240364b44b216208880483919937cf7 |
| COMODO ECC Certification Authority | 19.Jan.38 | 9f744e9f2b4dbaec0f312c50b6563b8e2d93c311 |
| USERTrust RSA Certification Authority | 19.Jan.38 | 2b8f1b57330dbba2d07a6c51f70ee90ddab9ad8e |
| ISRG Root X1 | 4.Jun.35 | cabd2a79a1076a31f21d253635cb039d4329a5e8 |
| DigiCert High Assurance EV Root CA | 10.Nov.31 | 5fb7ee0633e259dbad0c4c9ae6d38f1a61c7dc25 |
| VeriSign Class 3 Public Primary Certification Authority - G5 | 17.Jul.36 | 4eb6d578499b1ccf5f581ead56be3d9b6744a5e5 |
| GlobalSign | 15.Dec.21 | 75e0abb6138512271c04f85fddde38e4b7242efe |
| QuoVadis Root CA 3 | 25.Nov.31 | 1f4914f7d874951dddae02c0befd3a2d82755185 |
| GlobalSign | 18.Mar.29 | d69b561148f01c77c54578c10926df5b856976ad |
| Starfield Services Root Certificate Authority - G2 | 1.Jan.38 | 925a8f8d2c6d04e0665f596aff22d863e8256f3f |
| Baltimore CyberTrust Root | 13.May.25 | d4de20d05e66fc53fe1a50882c78db2852cae474 |
| AAA Certificate Services | 1.Jan.29 | d1eb23a46d17d68fd92564c2f1f1601764d8e349 |
| Amazon Root CA 3 | 26.May.40 | 0d44dd8c3c8c1a1a58756481e90f2e2affb3d26e |
| VeriSign Class 3 Public Primary Certification Authority - G3 | 17.Jul.36 | 132d0d45534b6997cdb2d5c339e25576609b5cc6 |
| GlobalSign Root CA | 28.Jan.28 | b1bc968bd4f49d622aa89a81f2150152a41d829c |
| Actalis Authentication Root CA | 22.Sep.30 | f373b387065a28848af2f34ace192bddc78e9cac |
| AffirmTrust Networking | 31.Dec.30 | 293621028b20ed02f566c532d1d6ed909f45002f |
| AffirmTrust Premium | 31.Dec.40 | d8a6332ce0036fb185f6634f7d6a066526322827 |
| QuoVadis Root Certification Authority | 18.Mar.21 | de3f40bd5093d39b6c60f6dabc076201008976c9 |
| 6.Jun.37 | feb8c432dcf9769aceae3dd8908ffd288665647d | |
| GeoTrust Primary Certification Authority - G3 | 2.Dec.37 | 039eedb80be7a03c6953893b20d2d9323a4c2afd |
| thawte Primary Root CA - G2 | 19.Jan.38 | aadbbc22238fc401a127bb38ddf41ddb089ef012 |
| VeriSign Universal Root Certification Authority | 2.Dec.37 | 3679ca35668772304d30a5fb873b0fa77bb70d54 |
| Cybertrust Global Root | 15.Dec.21 | 5f43e5b1bff8788cac1cc7ca4a9ac6222bcc34c6 |
| Global Chambersign Root | 1.Oct.37 | 339b6b1450249b557a01877284d9e02fc3d2d8e9 |
| SwissSign Silver CA - G2 | 25.Oct.36 | 9baae59f56ee21cb435abe2593dfa7f040d11dcb |
| Amazon Root CA 1 | 17.Jan.38 | 8da7f965ec5efc37910f1c6e59fdc1cc6a6ede16 |
| Entrust Root Certification Authority - G2 | 8.Dec.30 | 8cf427fd790c3ad166068de81e57efbb932272d4 |
| Amazon Root CA 2 | 26.May.40 | 5a8cef45d7a69859767a8c8b4496b578cf474b1a |
| DigiCert Assured ID Root CA | 10.Nov.31 | 0563b8630d62d75abbc8ab1e4bdfb5a899b24d43 |
| 30.Jun.34 | 2796bae63f1801e277261ba0d77770028f20eee4 | |
| COMODO Certification Authority | 1.Jan.30 | 6631bf9ef74f9eb6c9d5a60cba6abed1f7bdef7b |
| AddTrust External CA Root | 30.May.20 | 02faf3e291435468607857694df5e45b68851868 |
| COMODO RSA Certification Authority | 19.Jan.38 | afe5d244a8d1194230ff479fe2f897bbcd7a8cb4 |
| thawte Primary Root CA - G3 | 2.Dec.37 | f18b538d1be903b6a6f056435b171589caf36bf2 |
| DigiCert Global Root G3 | 15.Jan.38 | 7e04de896a3e666d00e687d33ffad93be83d349e |
| GeoTrust Global CA | 21.May.22 | de28f4a4ffe5b92fa3c503d1a349a7f9962a8212 |
| DigiCert Global Root G2 | 15.Jan.38 | df3c24f9bfd666761b268073fe06d1cc8d4f82a4 |
- Origin Server Port
An origin server must be operated by a web-protocol support service. Service port numbers can be set for HTTP/HTTPS protocols under operations.
Either HTTP or HTTPS must be entered for the origin server port, and if not set, a port is set by default with HTTP:80 or HTTPS:443.
Only limited number of ports are available as the original port. Refer to the following table for available port numbers.
[Table 2] Available Origin Server Port Numbers
| Port Number |
|---|
| 72, 488, 1080, 1443, 7070 |
| 8000-9001 |
| 11080-11110 |
| 80-89 |
| 591, 1088, 2080, 7612 |
| 12900-12949 |
| 443, 777, 1111, 7001, 7777 |
| 9901-9908 |
| 45002 |
- Original Path
Set the a sub-path of an original file. Content may be requested without the original path.
[Example] When the original path is set with /files/images
- URL of Original File: http://your.origin.com/files/images/logo.png
- URL of CDN Service: http://[ServiceID].toastcdn.net/logo.png
- Origin paths may be missing from URL of CDN service when it is requested.
-
Downgrading HTTP Protocols Requesting Originals The CDN edge server requests origin server of the original files via service protocol (HTTP/HTTPS) of client's original request. That is, when a client requests via HTTPS but if the origin server does not support HTTPS response, original files do not come as response. If the origin server operates HTTPS protocols only, enable the Downgrading HTTP Protocols Requesting Originals setting and make a request from CDN edge server to origin server by downgrading HTTPS to HTTP protocol. In short, the CDN edge server section of client is communicated via HTTPS, while the origin server section of CDN edge server is communicated via HTTP. Note the following constraints when downgrading HTTP protocols requesting originals:
[Caution] Constraints for Downgrading HTTP Protocols Requesting Originals 1. Protocol downgrade is not applied to the entire website address. For instance, www.nhn.com, which is the entire site address of the origin server, cannot be downgraded. 2. No other methods than GET, HEAD, or OPTIONS, are supported. 3. When a downgrade is requested from CDN to an origin server, following headers may be excluded: Origin, Referer, Cookie, Cookie2, sec-*, proxy-*
-
Forward Host Header Set Host header value to be sent along with a request of CDN server for original files to origin server. If the origin server is run as name-based virtual host, Request Host Header setting may be required. Select an appropriate value depending on the operating type of an origin server.
- Original Host Name: Set the host name of origin server as the host header.
- Request Host Header: Set as the host header of client request.
[Caution] Validation of host header and origin server certificate when using secure transport (HTTPS) When a client requests content over secure transport (HTTPS), the CDN server checks whether the origin server's certificate is valid. The origin server must have a certificate of Common Name (CN) or Subject Alternate Name (SAN) that matches the host request header installed. A secure transport error occurs if the certificate matching the host request header is not installed on the origin server. Note that the host request header is set as the request host header or the original host name according to the Forward Host Header setting.
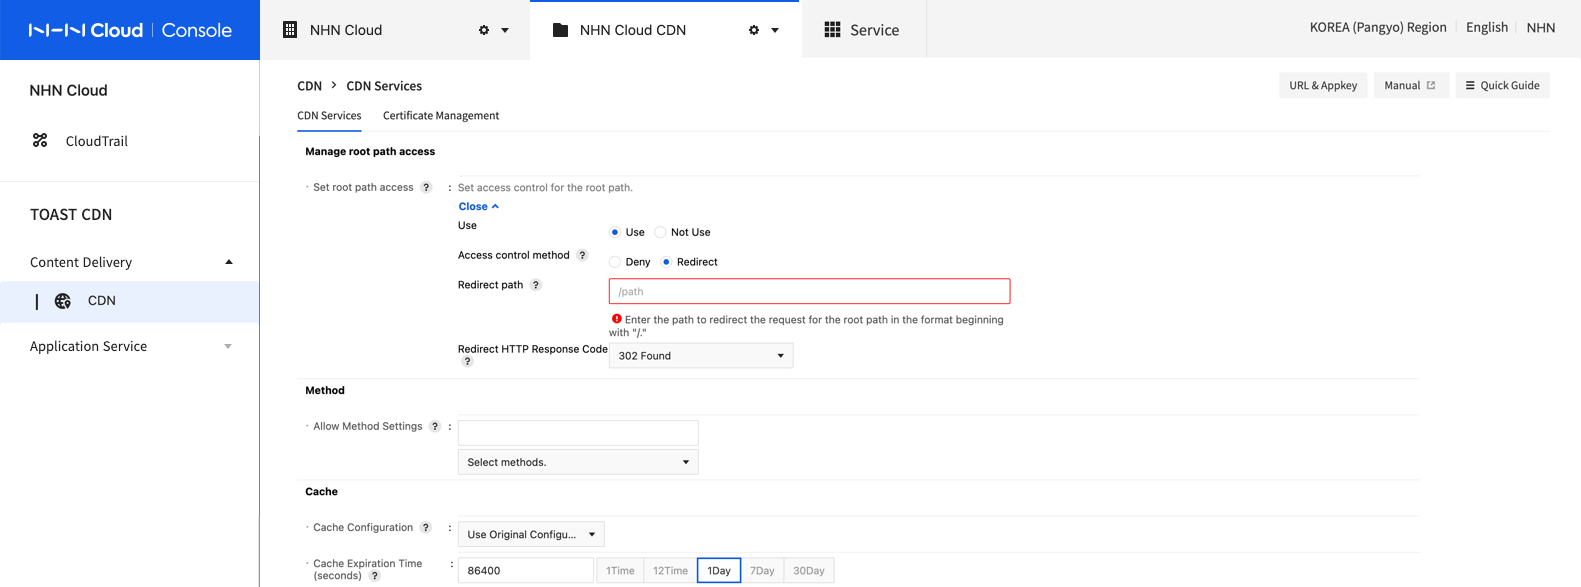
Controlling the access of root path
You can set the access control for the root path of the CDN service.
- Set Root Path Access
- Enable: Activates the access control for the root path, blocking requests for the root path or configuring such requests to be redirected to a different page.
- Disable: Deactivates the access control for the root path.
- Access Control Method
- Deny: Replies with HTTP Response Code 403 when receiving request for the root path.
- Redirect: Redirects the request for the root path to a path specified by the User.
- Redirect Path Enter the path to redirect the request for the root path to. The redirect path must start with a "/," and must be a path that exists in CDN service.
- Redirect HTTP Response Code
- Set up the HTTP Response Code to be sent after redirecting the request for the root path.
- Redirect HTTP Response Code can be selected among 301, 302, 303, and 307.
Method
By default, the allowed methods for CDN include GET, HEAD, and OPTIONS, the request for other methods is denied.
To allow methods other than the allowed methods, select and set a method you want.
- Allow Method Settings Allowed method requests are not cached and forwarded to the origin server.
Cache
CDN cache operations and expiration time can be set.
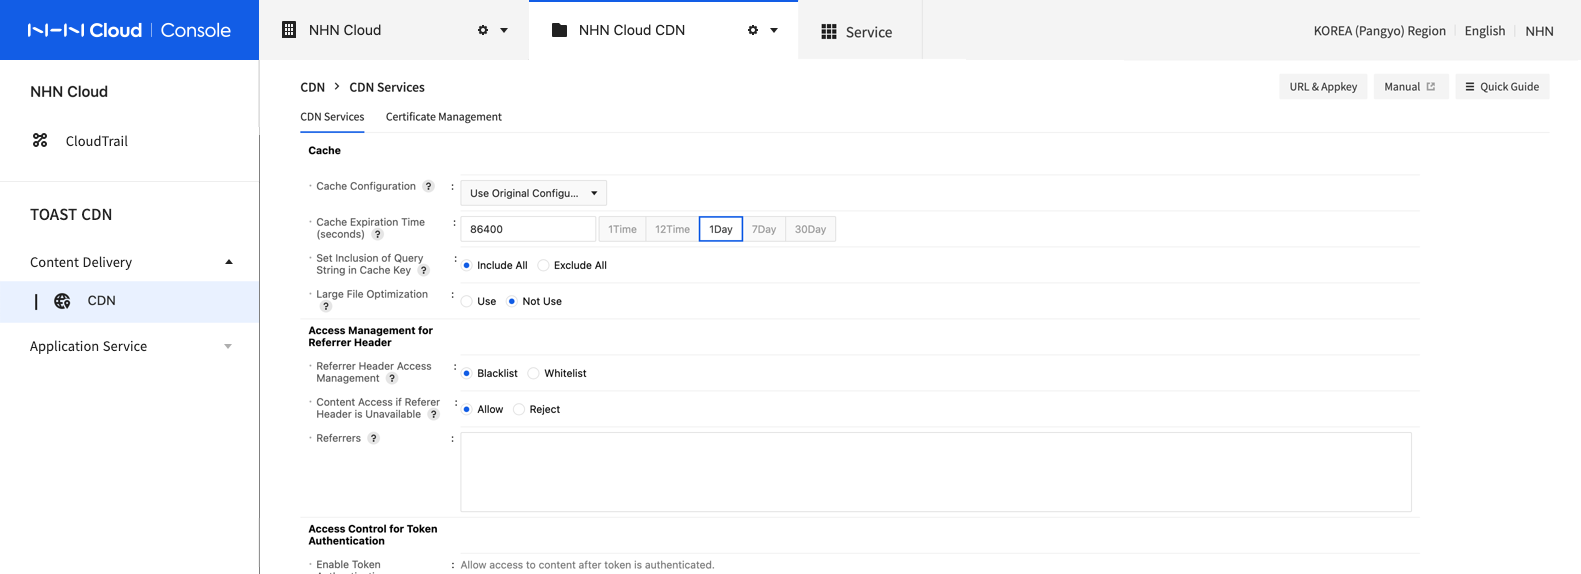
- Configuration of Cache When the CDN server enables caching of the original file, you can choose which cache configuration to use.
Configuration of Cache Expiration Cache can be configured from the response header of cache control at the origin server. - Use Original Configuration: Apply the cache control header first, as provided by the origin server's response. If cache control header is not valid or unavailable, it is cached during specified cache expiration time (seconds). Use Original Configuration is default. - Use User Configuration: Cached during specified cache expiration time (seconds). - Bypass Cache: Maintain the cache created before the configuration and do not cache content requests after the configuration. - No Store: Remove all the existing caches and disable CDN caching.
-
Cache Expiration Time (seconds) To specify a cache expiration time, click the Use User Configuration button and change the cache expiration time in Cache Expiration Time (seconds).
-
Set Inclusion of Query String in Cache Key You can set whether to include the request query string in the cache key generated based on the URL.
- Include All: Include the entire query string included in the request in the cache key. Because the cache key contains the request query string, a new cache key is generated whenever the query string is changed for the same content request. Select if you want to cache the content newly by changing the request query string. The Include All option is the default.
- Exclude All: Generates a cache key using only the URL, excluding all query strings included in the request. If the request query string needs to be changed constantly, you must set this option for caching to work.
[Note] Default value and valid range of cache expiration time The default cache expiration time is 0. With 0 as default, the cache expiration time is 604,800 (seconds) = 1 week. Cache expiration time is available from 0 (default) to 2,147,483,647 (seconds).
- Large File Optimization Large file optimization is set to improve performance and stability when handling large files of 100 MB or more. If not set, the maximum file size allowed for CDN is below 1.8 GB, and this setting must be used for files larger than the limit.
[Note] Using the container created by the NHN Cloud Object Storage service as the origin server For the Large File Optimization feature to work normally, the ETag response header delivered from the origin server must be enclosed in double quotation marks. For more information about setting the ETag response header format for NHN Cloud Object Storage containers, see Change Container Settings > Use the RFC-compliant ETag Format in the API guide of Object Storage.
Access Management for Referer Header
Content access management is set with the referer request header.
The referer request header includes the webpage address of previous links of the currently requested page. It helps to find the paths a request comes from. With referer header access management, only particular request headers can be configured to access user content. Enter in regex, and break the lines to enter many.
-
Access control types
- Blacklist type:
- Suitable for restricting the access of particular referer request headers only.
- Content access is restricted if a referer request header matches regex setup. If not, content access is allowed.
- Whitelist type:
- Suitable for allowing the access of particular referer request headers only.
- Content access is allowed if a referer request header matches regex setup. If not, content access is not allowed.
- Blacklist type:
-
Content Access if Referer Header is Unavailable Select whether to allow access to content if referer request header is not available.
- Allow: If referer request header is not available, content access is allowed and the control of referer access does not operate.
- Deny: If referer request header is not available, content access is rejected and access is allowed only for registered referers.
[Example]
- Typ: Whitelist
- Regex:
^https://[a-zA-Z0-9._-]*\.nhn\.com/.*Content access is allowed only when resources are requested from a sub-path of a nhn.com sub-domain.[Note] Regex Escape Characters Some characters are used as special characters for regex. For instance, a period (
.) indicates agreement with all characters for regex. To understand a special character as a general one, add backlash before it.(e.g.:\.). Regex special characters include^, ., [, ], $, (, ), |, *, +, ?, {, }, and \. To control many referrers, enter in consecutive lines. To set many referrers with APIs, delimit with \n tokens.
Access Control for Auth Token Authentication
The Access Control for Auth Token authentication is a security feature that allows only verified tokens to access content from CDN edge server, by adding authentication token to a content request. You may control by allowing one-time access to content or only restricted users to access content. If content is requested with an invalid token, 403 Forbidden is sent as response and access to content is forbidden.
To apply the access of Auth Token Authentication to the CDN service, you need to follow the steps below.
[Caution]
Access Control for Auth Token authentication requires the following implementation, even on applications using NHN Cloud CDN. 1. Create a token required to access content. 2. Client (final content consumer) must request content including created token. If access management is configured without this process, content request may fail due to failed token authentication.
1. NHN Cloud CDN Console > Access Control Settings for Auth Token Authentication
On CDN console, set Access Control for Auth Token authentication by referring to the following.
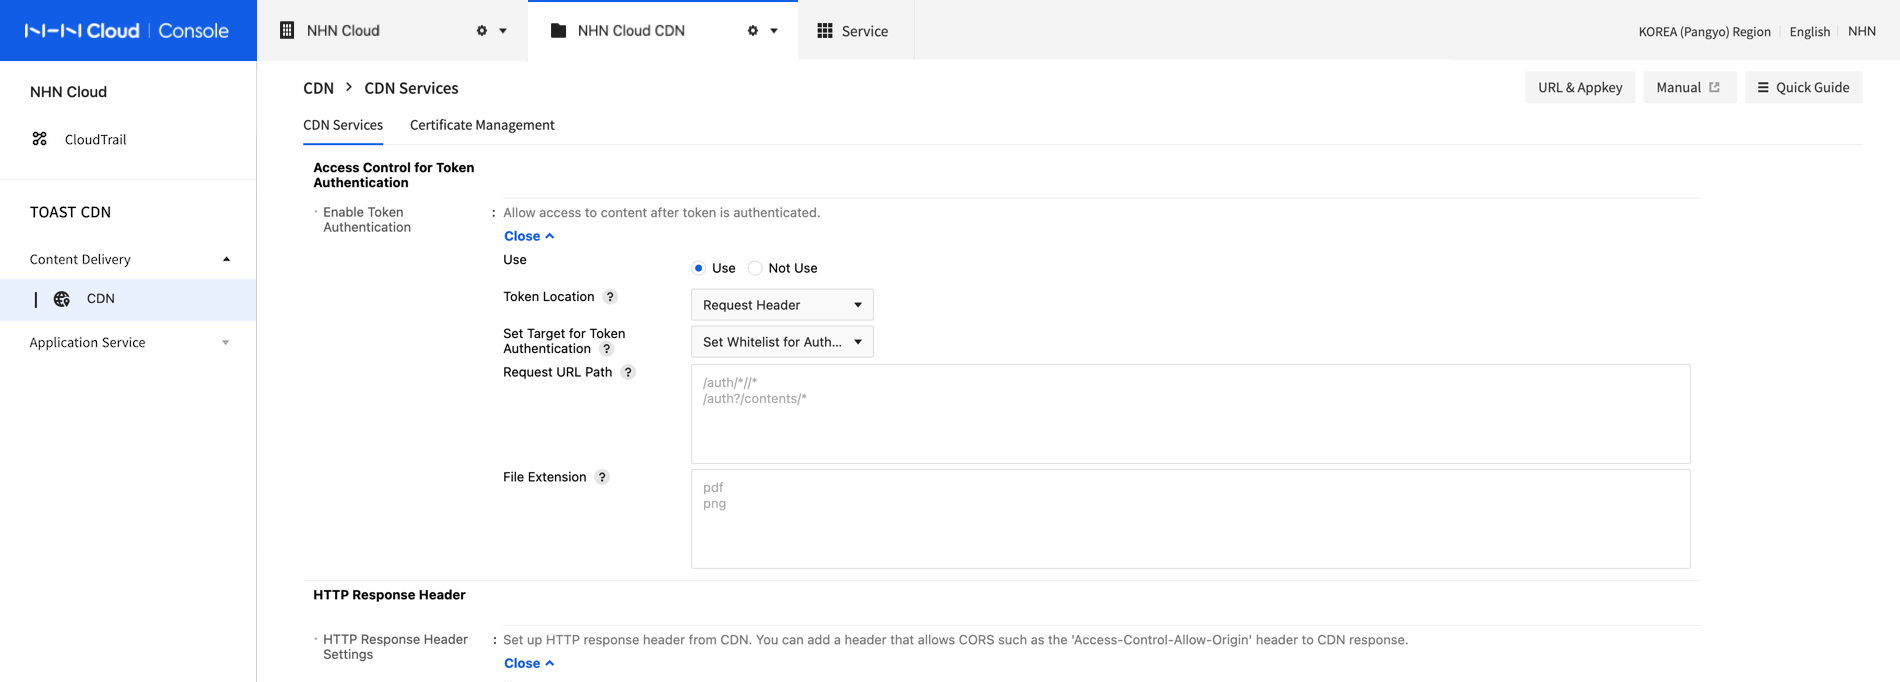
- Enable Token Authentication
- Enable: Activate Access Control for Auth Token authentication and verify token so as to allow access to content.
- Disable: Deactivate Access Control for Auth Token authentication.
- Token Location: Select a location to deliver token when content is requested.
- Cookie: Deliver token with a standard cookie. Note that devices or browsers that do not support cookies may not run properly.
- Request Header: Deliver token to the request header.
- Query String: Deliver token to the query string.
- Token Name
- Name of token to deliver token value. It is fixed as token which cannot be changed from console setting.
- Token Encryption Key
- Encryption key required to create a token. By creating or modifying CDN, an encryption key is automatically created.
- Please take caution of not disclosing the encryption key.
- Set Target for Token Authentication
Set a target of file for token authentication when accessing content.
Verify token only for files with their tokens to be authenticated; for other files, token is not verified, allowing content access without a token.
To verify token for a specified request URL or file extension only, enter the path and extension of the request URL; otherwise, verify tokens for all files.- Set Authentication Target: Verify tokens only for the files of configured request URL path and file extension.
- Set Exception from Authentication: Verify tokens for files excluding request URL path and file extension.
- Path of Request URL: If content URL has same path as that of request URL, set it for or against token authentication.
- The path of a request URL must start with '/' and wildcard characters (Many strings: *, Single string: ?) are available (e.g.: /nhn/*).
- The request URL path does not include a query string.
- Only ascii code characters are available for a request URL path.
- To enter many, change lines; with many inputs, only a single match enables token access control.
- When it is entered along with file extension, a matching condition of file extension enables token access control.
- File Extension: If content URL is same as file extension, it is set for or against token authentication.
- Enter file extension excluding '.' (e.g: pdf, png).
- To enter many, change lines; with many inputs, only a single match enables token access control.
- When it is entered along with request path URL, a matching condition of request path URL enables token access control.
[Caution] Path of Request URL and File Extension When request URL path and file extension are all set, only one match of the two conditions enables token access control. [Example] When the setting for request URL path is /nhn/*, with png as file extension: Verify token for all files under /nhn or content with png as file extension.
2. Create a Token
To allow the final content user to access content, content must be requested along with a token. Therefore, a token must be created to get issued to the final content user. Token creation must be implemented on an application using NHN Cloud CDN. To create a token, refer to the following sample code:
Java Sample Code
- This sample code has the following restrictions.
- JDK 7 or higher, with dependency on the org.projectlombok:lombok, or org.apache.commons:commons-lang3 library.
import org.apache.commons.lang3.StringUtils;
import javax.crypto.Mac;
import javax.crypto.spec.SecretKeySpec;
import javax.xml.bind.DatatypeConverter;
import java.io.UnsupportedEncodingException;
import java.math.BigInteger;
import java.net.URLEncoder;
import java.security.InvalidKeyException;
import java.security.NoSuchAlgorithmException;
import java.util.Calendar;
import java.util.TimeZone;
import java.util.regex.Matcher;
import java.util.regex.Pattern;

public class NhnCloudAuthTokenAccessControlExample {

    // Token encryption key for authentication verified on NHN Cloud console
    private static final String AUTH_TOKEN_ENCRYPT_KEY = "{Token encryption key of NHN Cloud CDN}";
    // Valid token time (seconds)
    private static final Long TOKEN_DURATION_SECONDS = 3600L;


    public static void main(String[] args) throws AuthTokenException {

        String path = "/nhn/%EC%9D%B8%EC%A6%9D/%E1%84%91%E1%85%A1%E1%84%8B%E1%85%B5%E1%86%AF.png";
        String singleWildcardPath = "/nhn/%EC%9D%B8%EC%A6%9D/*";
        String[] multipleWildcardPath = {"/nhn/%EC%9D%B8%EC%A6%9D*", "/nhn/auth/*"};

        System.out.println(" ----------------- ");
        System.out.println(" Issue Default Token ");
        System.out.println(" ----------------- ");

        AuthToken authToken = new AuthToken(AUTH_TOKEN_ENCRYPT_KEY, TOKEN_DURATION_SECONDS);

        System.out.println("Single URL Token: token=" + authToken.generateURLToken(path));
        System.out.println("Wildcard Token: token=" + authToken.generateWildcardPathToken(singleWildcardPath));
        System.out.println("Multiple Wildcard Token: token=" + authToken.generateWildcardPathToken(multipleWildcardPath));

        System.out.println(" ----------------- ");
        System.out.println("Issue token including session identifier ");
        System.out.println(" ----------------- ");

        AuthToken authTokenWithSession = new AuthToken(AUTH_TOKEN_ENCRYPT_KEY, TOKEN_DURATION_SECONDS, "example-sessionId");
        System.out.println("Single URL Token: token=" + authTokenWithSession.generateURLToken(path));
        System.out.println("Wildcard Token: token=" + authTokenWithSession.generateWildcardPathToken(singleWildcardPath));
        System.out.println("Multiple Wildcard Token: token=" + authTokenWithSession.generateWildcardPathToken(multipleWildcardPath));

    }


    public static class AuthToken {

        /** Token Encryption Algorithm (fixed with SHA256) **/
        private static final String HMAC_SHA_256 = "HmacSHA256";

        /** Token Encryption Key (NHN Cloud CDN Console > Access Control for Auth Token authentication  > Encryption key) **/
        private String key;

        /**  Session Identifier */
        private String sessionId;

        /** Token Valid Time (Unit: Second) */
        private Long durationSeconds;

        /** Enable url encode application before token is created */
        private Boolean escapeEarly;

        /** Delimiter of Body Field of Token */
        private final String fieldDelimiter = "~";

        /** wildcardPath Delimiter */
        private final String aclDelimiter = "!";


        public AuthToken(String key, Long durationSeconds) {
            this.key = key;
            this.sessionId = null;
            this.durationSeconds = durationSeconds;
            this.escapeEarly = true;

        }


        public AuthToken(String key, Long durationSeconds, String sessionId) {
            this.key = key;
            this.sessionId = sessionId;
            this.durationSeconds = durationSeconds;
            this.escapeEarly = true;
        }


        /**
        * Create a token for a single URL.
        * @param path : contents url (example: /auth/contents/example.png)
        * @return created token
        * @throws AuthTokenException
        */
        public String generateURLToken(String path) throws AuthTokenException {
            return generateToken(createExpireTime(), this.sessionId, path, null);

        }


        /**
        * Create token for wildcard path.
        * @param wildcardPath : "/auth/contents/*"
        * @return Created token value
        * @throws AuthTokenException
        */
        public String generateWildcardPathToken(String wildcardPath) throws AuthTokenException {
            return generateWildcardPathToken(new String[] {wildcardPath});
        }

        /**
        * Create token for multiple wildcard paths.
        * @param wildcardPaths (example: ["/auth/contents/*", "/auth/*/images/*"])
        * @return Created token value
        * @throws AuthTokenException
        */
        public String generateWildcardPathToken(String... wildcardPaths) throws AuthTokenException {
            return generateToken(createExpireTime(), this.sessionId, null, wildcardPaths);

        }


        private String createExpireTime() {
            Long nowSeconds = Calendar.getInstance(TimeZone.getTimeZone("UTC")).getTimeInMillis() / 1000L;
            Long exp = nowSeconds + this.durationSeconds;
            return exp.toString();
        }


        private String generateToken(String exp, String sessionId, String path, String[] wildcardPaths) throws AuthTokenException {

            try {

                StringBuilder token = new StringBuilder();
                token.append("exp=")
                    .append(exp)
                    .append(this.fieldDelimiter);

                if (wildcardPaths != null && wildcardPaths.length > 0) {
                    token.append("acl=")
                        .append(escapeEarly(StringUtils.join(wildcardPaths, this.aclDelimiter)))
                        .append(this.fieldDelimiter);
                }

                if (sessionId != null && sessionId.length() > 0) {
                    token.append("id=")
                        .append(escapeEarly(sessionId))
                        .append(this.fieldDelimiter);
                }

                StringBuilder hashSource = new StringBuilder(token);
                if (path != null && path.length() > 0) {
                    hashSource.append("url=")
                              .append(escapeEarly(path))
                              .append(this.fieldDelimiter);

                }

                // remove last fieldDelimiter char
                hashSource.deleteCharAt(hashSource.length() - 1);

                Mac hmac = Mac.getInstance(HMAC_SHA_256);
                byte[] keyBytes = DatatypeConverter.parseHexBinary(this.key);
                SecretKeySpec secretKey = new SecretKeySpec(keyBytes, HMAC_SHA_256);
                hmac.init(secretKey);

                byte[] hmacBytes = hmac.doFinal(hashSource.toString().getBytes());
                return token.toString() + "hmac=" + String.format("%0" + (2 * hmac.getMacLength()) + "x", new BigInteger(1, hmacBytes));

            } catch (NoSuchAlgorithmException e) {
                throw new AuthTokenException(e.getMessage());
            } catch (InvalidKeyException e) {
                throw new AuthTokenException(e.getMessage());
            }

        }


        private String escapeEarly(final String text) throws AuthTokenException {
            if (this.escapeEarly == true) {
                try {
                    StringBuilder newText = new StringBuilder(URLEncoder.encode(text, "UTF-8"));
                    Pattern pattern = Pattern.compile("%..");
                    Matcher matcher = pattern.matcher(newText);
                    String tmpText;
                    while (matcher.find()) {
                        tmpText = newText.substring(matcher.start(), matcher.end()).toLowerCase();
                        newText.replace(matcher.start(), matcher.end(), tmpText);
                    }
                    return newText.toString();
                } catch (UnsupportedEncodingException e) {
                    return text;
                } catch (Exception e) {
                    throw new AuthTokenException(e.getMessage());
                }
            } else {
                return text;
            }
        }

    }

    public static class AuthTokenException extends Exception {
        private static final long serialVersionUID = 1L;


        public AuthTokenException(String msg) {
            super(msg);
        }
    }

}
- Description of Member Variables of AuthToken Class
- key: Go to NHN Cloud CDN console, Access Control for Auth Token Authentication > and enter Token Encryption Key.
- sessionId: To create a token including origin identifier for the request of a single access, enter sessionId.
- With a valid token created for each session ID, you may create one-time tokens or apply it to many purposes.
- Session ID must be configured with List of Available Ascii Characters.
- Session ID cannot be larger than 36 bytes for the length of character string.
- durationSeconds: Valid time (seconds) for created token; authentication for invalid tokens shall fail.
- If valid token time is set too short, token may be expired even before verified on the CDN edge server. It is recommended to set longer than 10 seconds than expected valid time.
- Make sure to validate NTP (Network Time Protocol) synchronization on the token creation server; if time is not synchronized, it may fail to validate token time.
- Public Method of AuthToken Class
- public String generateURLToken(String path)
- Create token for a single path.
- [Example] path: authToken.generateURLToken("/auth/contents/example.png")
- [Caution] For path or session ID, change it into encoded character strings before creating a token. (e.g: /nhn/인증/파일.png => /nhn/%EC%9D%B8%EC%A6%9D/%E1%84%91%E1%85%A1%E1%84%8B%E1%85%B5%E1%86%AF.png).
- [Caution] Since ! and ~ are used as reserved characters, do not include them into path or session ID.
- public String generateWildcardPathToken(String wildcardPath), public String generateWildcardPathToken(String... wildcardPaths)
- Create token of the path mapped with the wildcard path. If their patterns of path match, it only takes a single wildcard token to authenticate tokens of URLs of many contents.
- [Example1] wildcardPath: authToken.generateWildcardPathToken("/auth/contents/*"): Issue token for all files under /auth/contents.
- [Example2] wildcardPath: authToken.generateWildcardPathToken("/auth/contents/*.png"): Issue token for the png file on the auth/contents path.
- [Example3] wildcardPath: authToken.generateWildcardPathToken("/auth/contents/exmaple?.png"): Issue token for the png file that combines example on the /auth/contents path and single characters.
- [Caution] For path or session ID, change it into encoded character strings before creating a token(e.g: /nhn/인증/파일.png => /nhn/%EC%9D%B8%EC%A6%9D/%E1%84%91%E1%).
- [Caution] Since ! and ~ are used as reserved characters, do not include them into path or session ID.
- Created token is created in the format of exp={expirationTime}~acl={path!path!path}~id={sessionId}~hmac={HMAC}.
- [Example] Created token: exp=1600331503~acl=%2fnhn%2f*.png~id=session-id1~hmac=2509123dcabe2fc199e3ac44793e4e135a09590ff4ebf6a902ea26469ead7f91
- Create token of the path mapped with the wildcard path. If their patterns of path match, it only takes a single wildcard token to authenticate tokens of URLs of many contents.
- public String generateURLToken(String path)
3. Include created token to the request of content
Client (final content consumer) must request content including the token value which is created from the location as configured on the console.
- Location of Token: Cookie
curl --cookie "token={Created token value}" \ -X GET http://xxx.toastcdn.net/auth/contents/example.png - Location of Token: Request header
curl -H "token: {Created token value}" \ -X GET http://xxx.toastcdn.net/auth/contents/example.png - Location of Token: Query string
curl -d "token={Created token value}" \
    -X GET http://xxx.toastcdn.net/auth/contents/example.png
HTTP Response Header
This is a feature to add, modify, and delete the headers sent when CDN responds to users.
You can set up to 10 headers with non-duplicate header names.
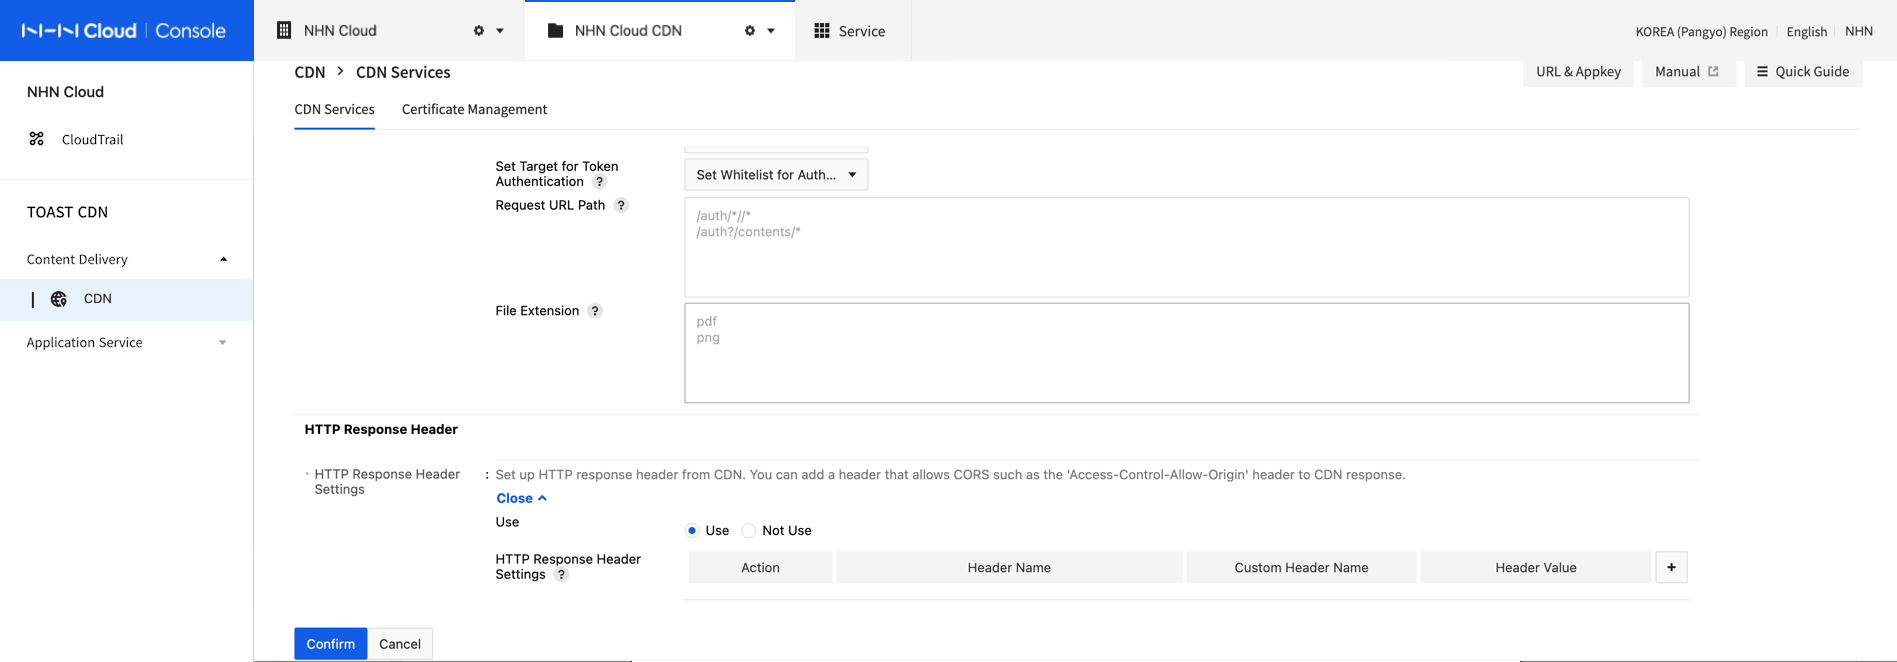
- HTTP Response Header Settings
- Use: Use the setting to add, modify, and delete HTTP response headers.
- Not use: Do not set up HTTP response headers.
- Action: Select how to modify HTTP response headers.
- Add: Add the set header name to respond to the user.
- Modify: Respond to the user by changing the header value if the set header name exists in the content, or adding it if it doesn't.
- Delete: Respond to the user by deleting the set header name.
- Header Name: Select a header name from the list, such as Access-Control-Allow-Origin, Cache-Control, Content-Type, or select "Enter manually" to set a custom header name defined by users.
- Custom Header Name: Enter a user-defined header name. You can only enter alphanumeric characters, '-', and '_'.
- Header Value: Set a header name value that is required.
[Note] Set CORS (Cross-Origin Resource Sharing) You can allow CORS by setting HTTP response headers as follows. - Action: Modify - Header Name: Access-Control-Allow-Origin - Header Value: * (wildcard) or the original URI to be allowed
Settings
Modify CDN Service Setting
CDN service settings can be modified, except for the service domain name.
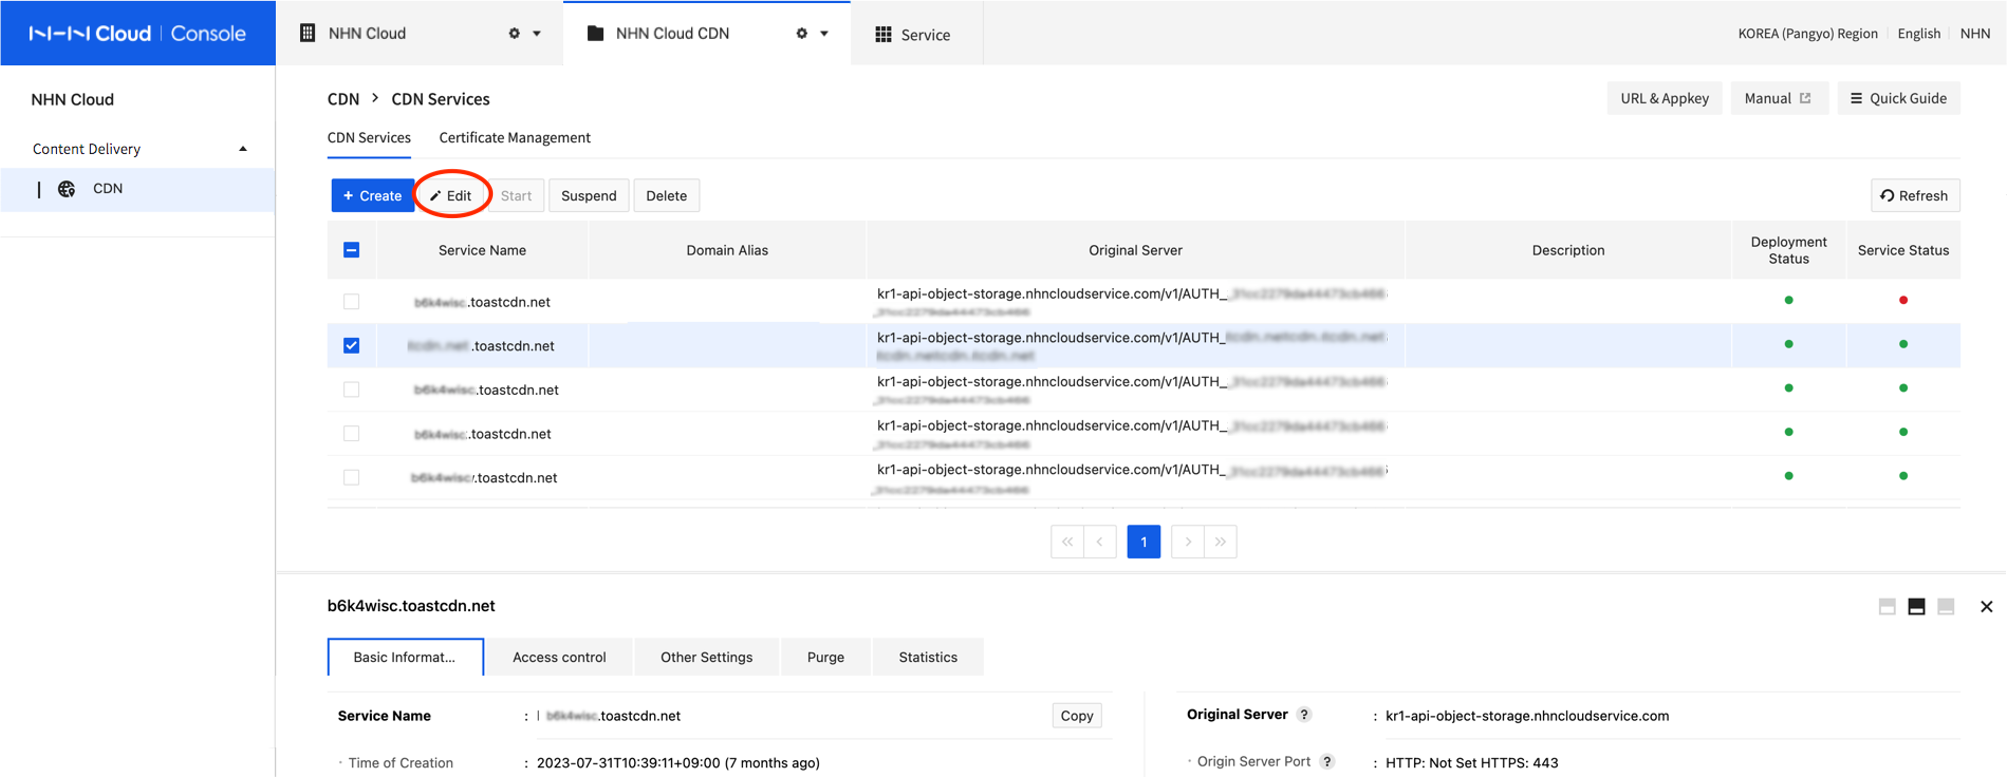
- Select a CDN service to modify from the list.
- Click Modify.
Then, navigates to the Modify CDN Service page as shown below.

- Modify the setting.
- Click OK to complete with changes.
- To edit other settings, except description and callback setting, it may take more time than usual since changes must be applied throughout the whole CDN server.
Modification takes dozens of minutes, but change of domain alias may take a few hours.
[Note] Deployment Status while Modifying CDN and Service Status If service is under modification, CDN runs in the existing service setting. If it fails to modify, it is rolled back to the existing setting information and the deployment status shows red circle on CDN list. Modification fails if there is error in setting information, or internal error occurs.
Suspend and Resume CDN
CDN service can be suspended or resumed.
- Select a CDN service to suspend.
- Click Suspend.
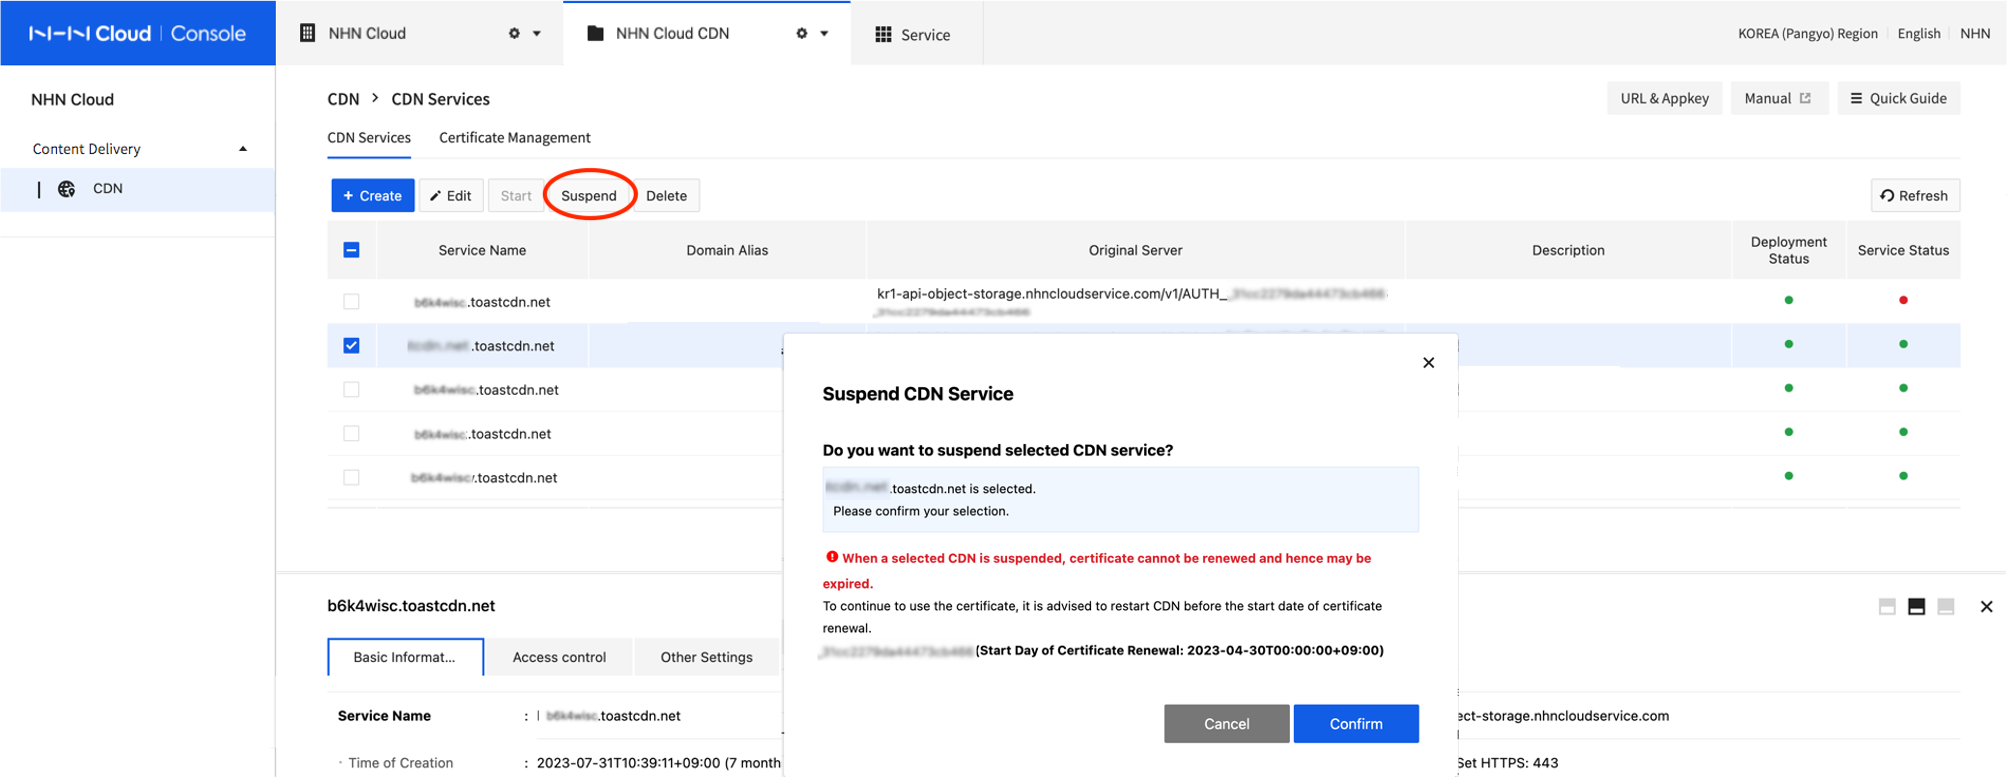
- A warning guide will show for CDN services that are integrated with certificate. To prevent certificate expiration, CDN service must be resumed before a start day of certificate renewal.
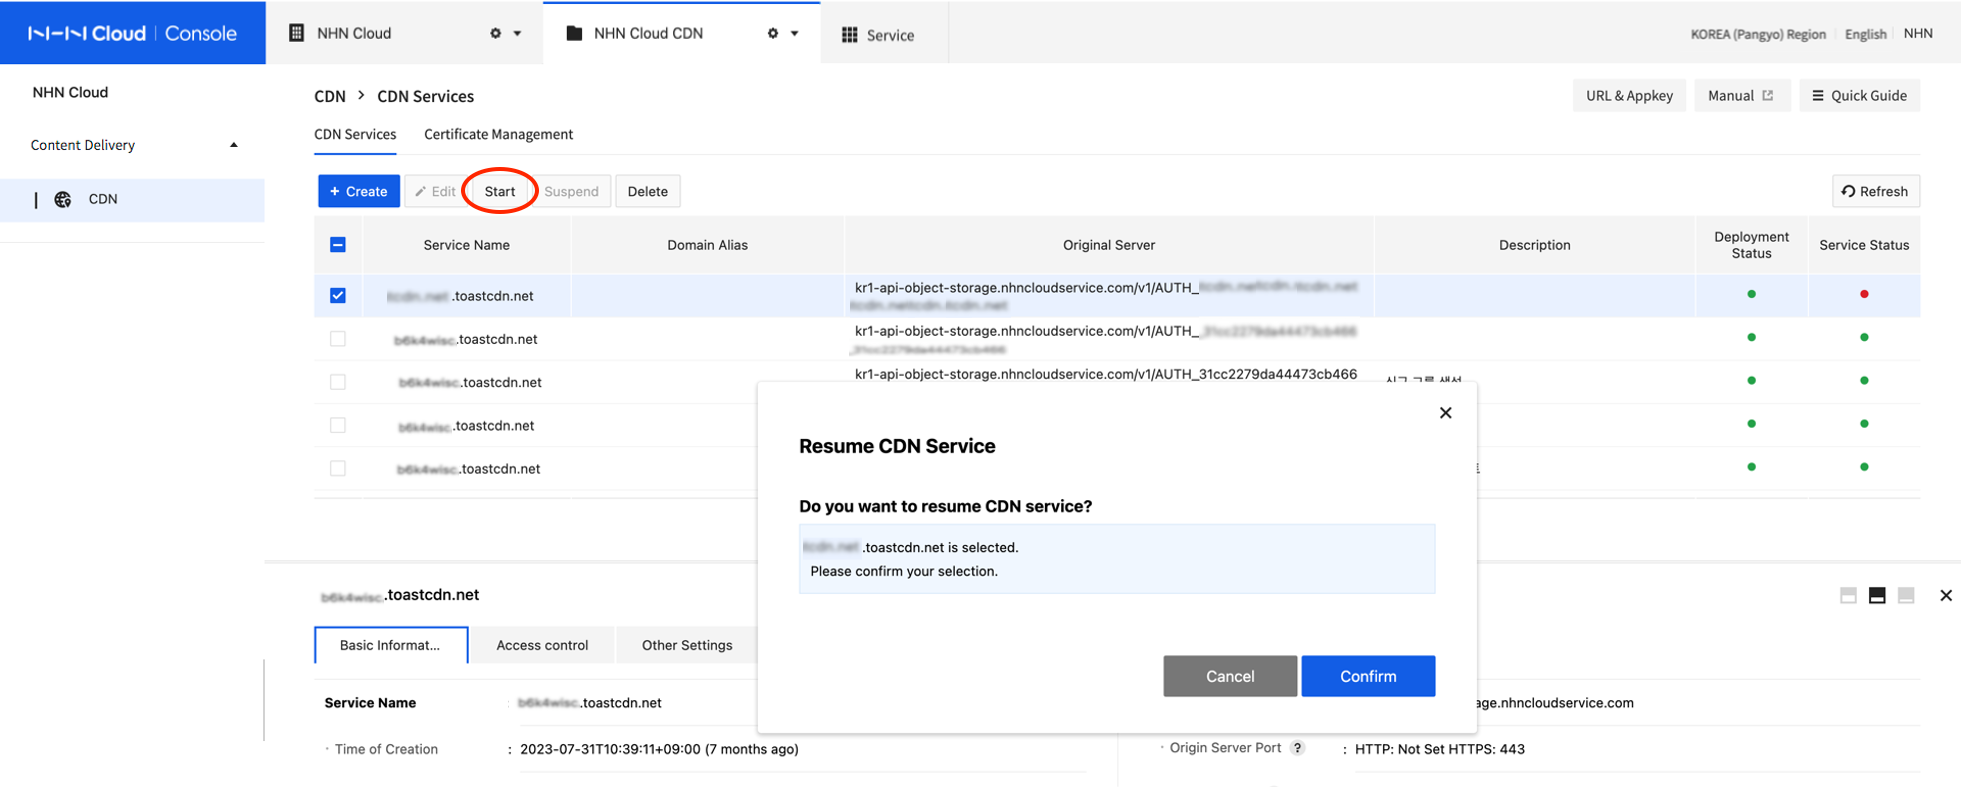
- To resume suspended CDN service, select a CDN service to resume.
- Click Resume.
[Note] Delays in Suspension and Resumption Suspension and resumption of CDN service operates by changing DNS records of CDN domain. Accordingly, even if it is cached during TTL at cache DNS server or suspension/resumption is completed, immediate suspension/resumption may not work depending on DNS transfer.
[Caution] Suspending CDN Service Integrated with Issued Certificate When a CDN service integrated with certificate is suspended, the certificate cannot be renewed. Please resume CDN before Start Day of Certificate Renewal from Certificate Management > Certificate List. A certificate is allowed to be renewed for 5 days after start day of renewal, and a suspension during the period may cause the certificate to get expired.
Delete CDN
CDN service can be deleted. Once deleted, however, a service cannot be recovered.
- Select a CDN service to delete.
- Click Delete.
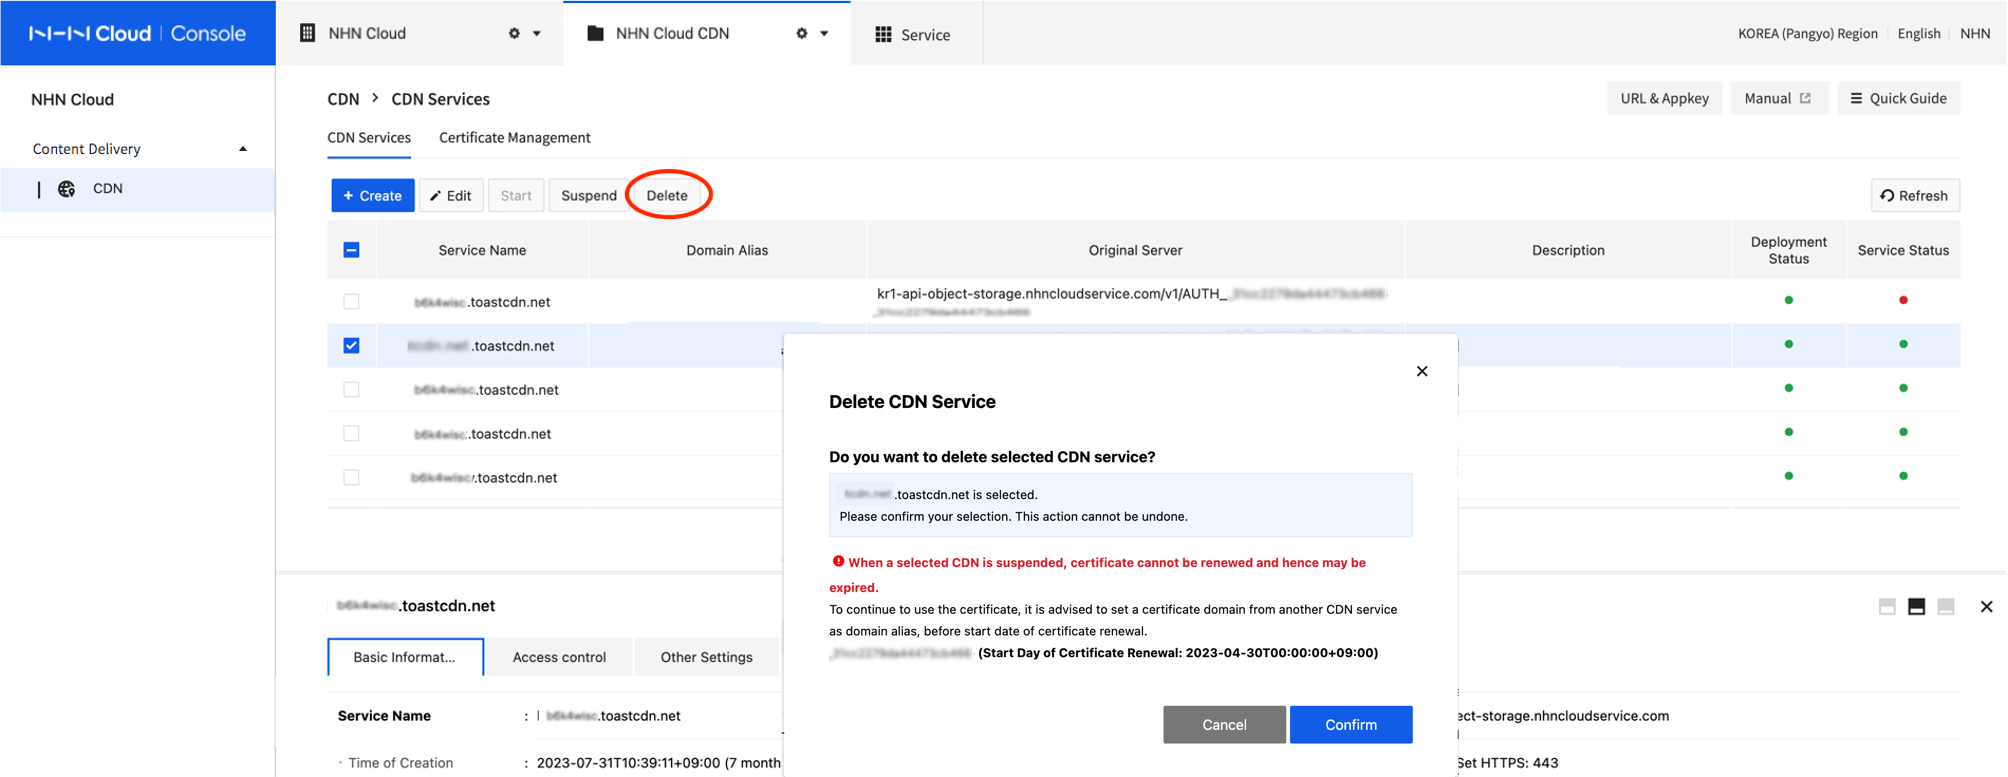
- A warning guide will show for CDN services that are integrated with certificate. To prevent certificate expiration, please integrate certificate with another running CDN service.
[Note] Required Time to Delete CDN It may take a few hours (up to 3) to delete CDN service.
[Caution] Deleting CDN Service Integrated with Issued Certificate When a CDN service integrated with certificate is deleted, the certificate cannot be renewed. Please integrate the certificate with another running CDN before Start Day of Certificate Renewal from Certificate Management > Certificate List. A certificate is allowed to be renewed for 5 days after start day of renewal, and deletion during the period may cause the certificate to get expired.
Purge
CDN cache server caches origin server files during specified expiration time depending on the cache setting. When a file is cached, the original file before change shall be maintained until cache is expired, even if there is a change in the original file. To immediately update content to changed original file, Purge must be requested. By purging cache, outdated cache data are deleted from requested content while a new original file is cached again at the origin server.
- Select a service to change from the list of CDN services.
-
Click the Purge tab to click Purge.
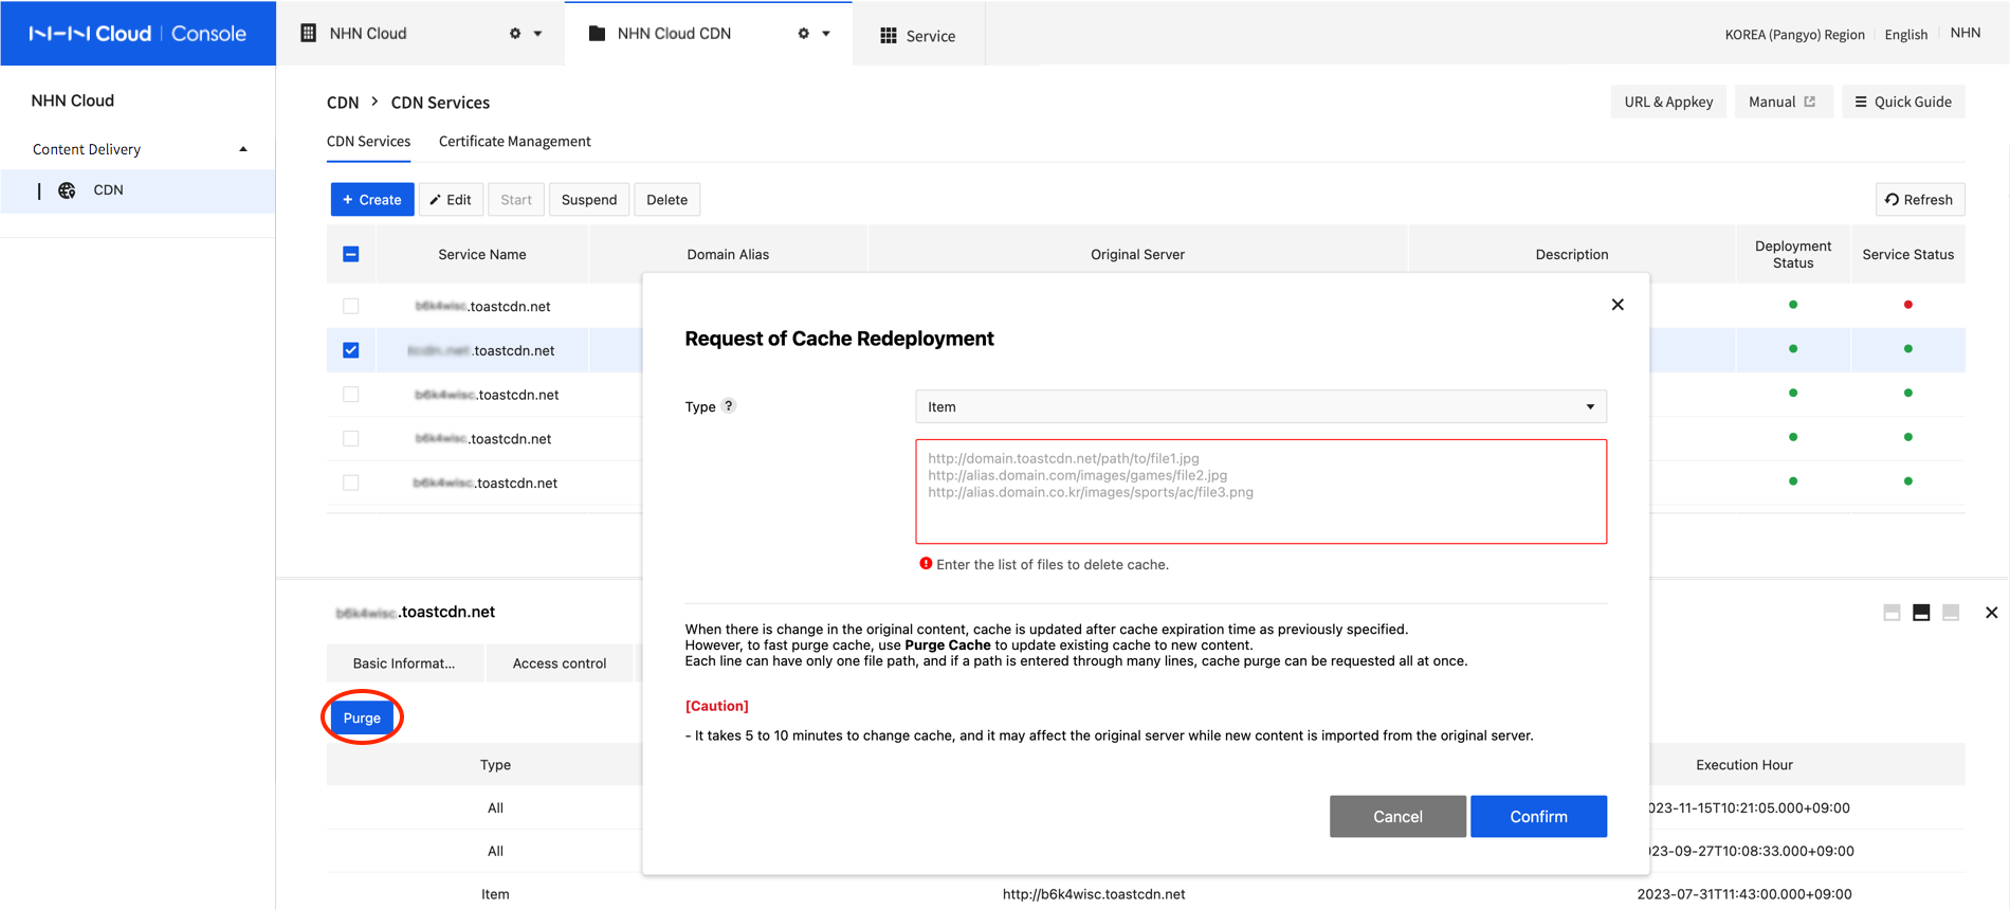
-
Select a purge type.
- Note that each CDN service domain may support different purge type and request format of cache.
- Purge type and request format
- Particular Files: Enter URL of content to purge. Since cache purge is applied for a requested URL only, purge must be requested to each URL address if there are many service domain addresses.
- e.g.) Domain address for default service: http://[ServiceID].toastcdn.net/path/to/file1.jpg
- e.g.) Domain address for domain alias: http://customer.domain.com/path/to/file1.jpg
- All Files: Delete all cache files. Note that excessive traffic inflow may be incurred to the origin server.
- Particular Files: Enter URL of content to purge. Since cache purge is applied for a requested URL only, purge must be requested to each URL address if there are many service domain addresses.
- Specify a file to purge depending on the selected cache purge type.
- Click Confirm to request for a purge.
Cache purge has a usage limit, so refer to the table below and be careful not to exceed the usage limit.
| Category | [ServiceID].toastcdn.net |
|---|---|
| Unit of Restrictions | Per project (Appkey) |
| Particular Files | Requests per second: 1 time, URLs per request: 200 URLs |
| All File Types | Requests per 5 minutes: 1 time |
[Caution] Failed Cache Purge after [ServiceID].toastcdn.net is created Cache purge request may fail within about an hour after CDN service is created. If failure continues afterwards, contact the NHN Cloud Customer Center.
Statistics
You can view network transfer volume, statistics by HTTP status code, and ranking statistics for your most downloaded content. Please note that statistics within 7 days are inaccurate and should be used as a guide only. For accurate statistics, check after 7 days.
- From the list of CDN services, select the service for which you want to view statistics.
- Click the Statistics tab.
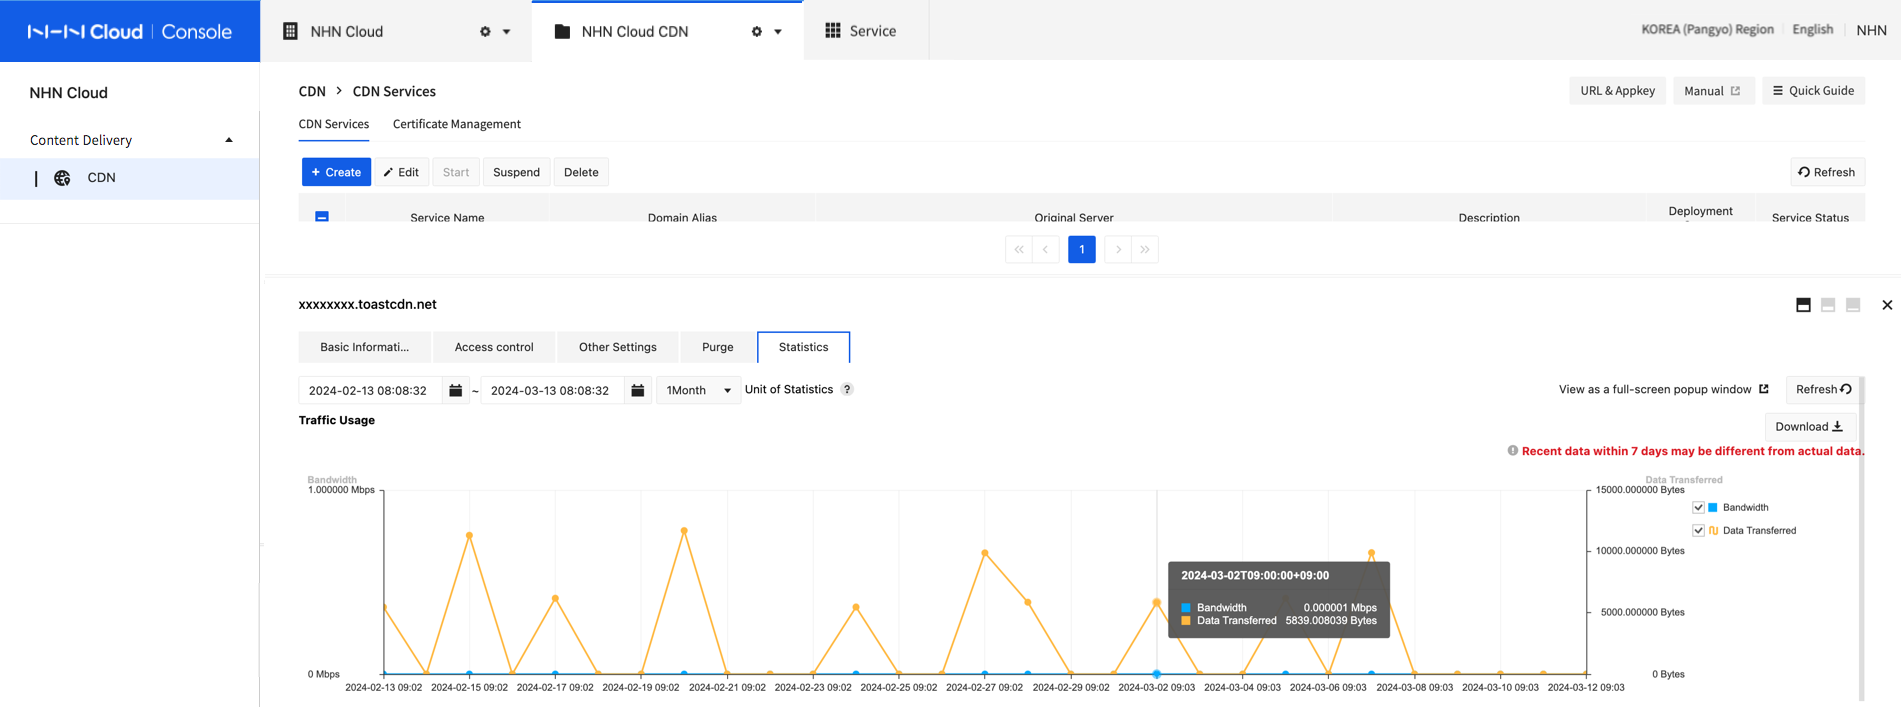
- Select a search period or date.
- The data intervals within the search period are automatically selected based on the time period you select.
[Note] Maximum search period You can view statistics data for up to 90 days. [Note] Restrictions for statistics of Top Contents By Hits Viewing is available up to one day in advance, with a range of one day or more. Content that is 100 KB or smaller or has fewer than 50 requests per day is excluded from statistics.
Managing Certificates
To use secure transport (HTTPS) via your own domain, certificate of your own domain must be deployed to CDN server. Without a certificate, secured communication (HTTPS) is unavailable between client (browser) and CDN edge server, causing error of certificate. Certificate management of NHN Cloud CDN provides the following features:
- Issue single domain-type certificates
- Deploy certificates to CDN servers at global points (except China and Russia)
- Auto-renew certificates before expired
Issue New Certificates
Certificates can be issued from the Certificate Management tab.
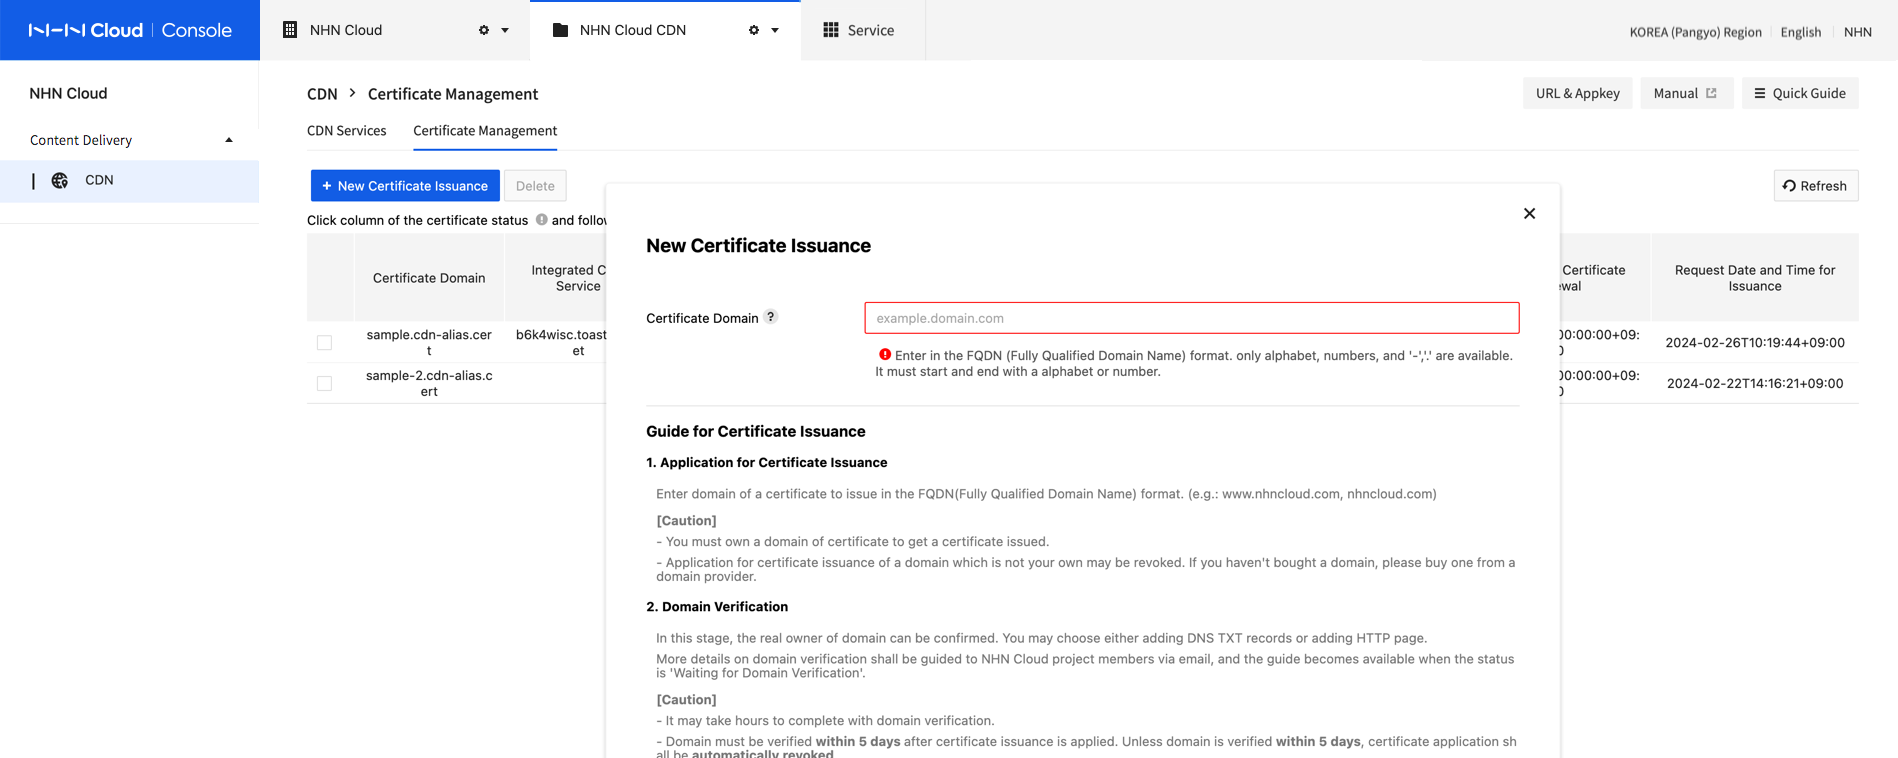
- Go to Certificate Management and click Issue New Certificates.
- Enter domain of certificate to get, in the format of full domain address(FQDN, fully qualified domain name).
- Check the guide to issue certificates and click OK.
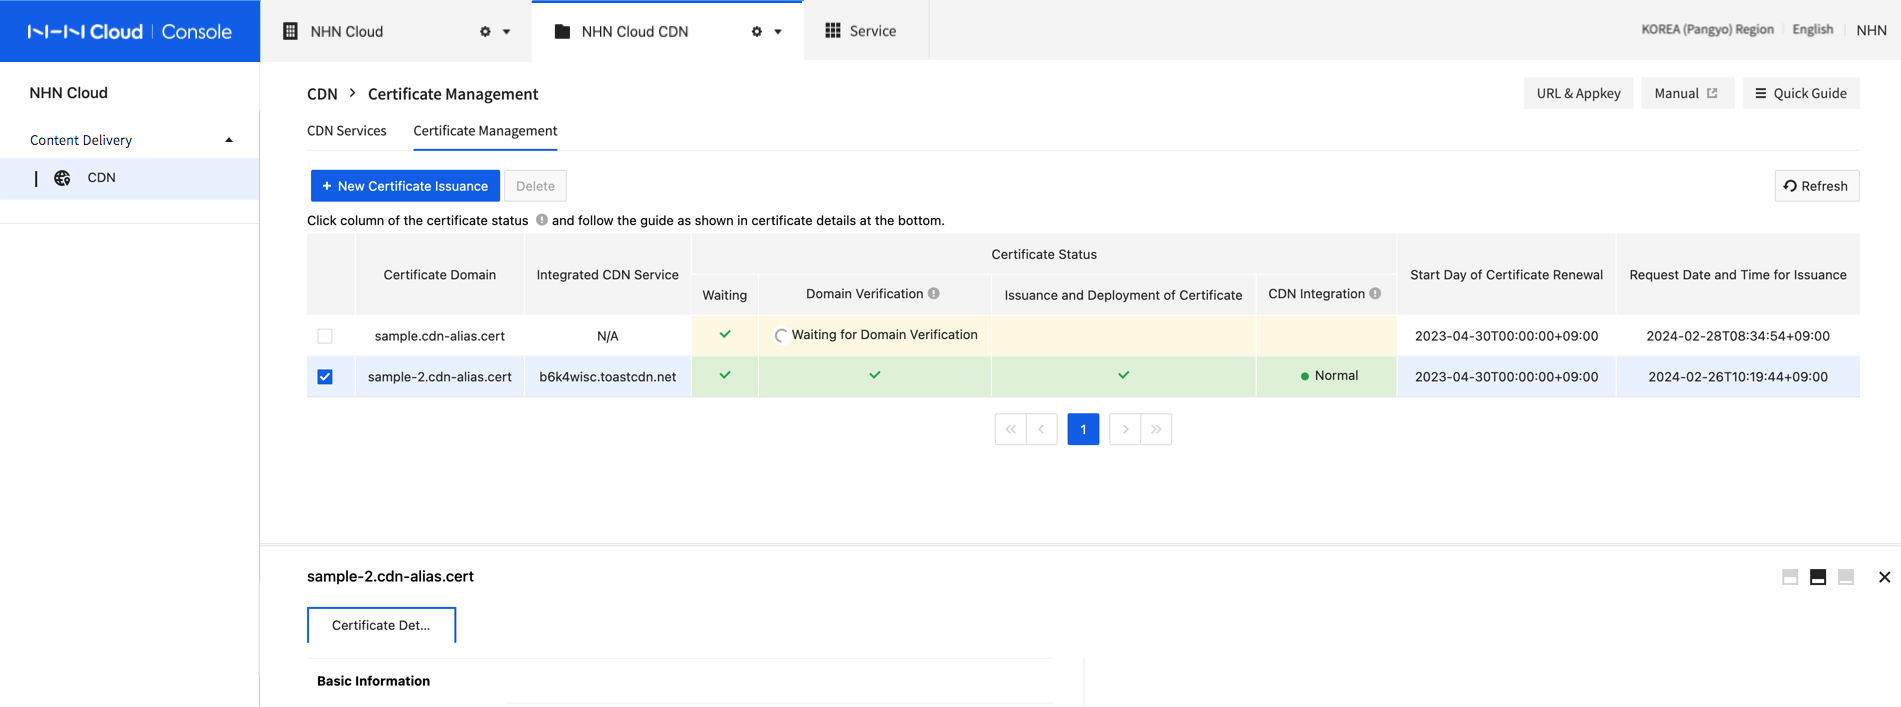
- When a new certificate is requested, certificate domain shows on the Certificate Management tab. When the certificate status is changed to Validate Domain, domain can be validated.
[Caution] Checkpoints before Getting a Certificate 1. Purchase a domain first, if not owned, because certificates can be issued to owned domains only. 2. Certificates issued from other certificate authorities are not allowed. 3. Only single-domain certificates can be issued. Wildcard or multi-domain certificates are not supported. 4. Each project allows no more than 5 certificates. If you need more than that, contact NHN Cloud Customer Center. 5. After certificate issuance is requested, the Validate Domain phase may be activated in several tens of minutes (up to 2 hours). If your certificate changes status to Validate Domain, email shall be sent to NHN Cloud project members. If email is not sent due to system error, check status on console.
Validate Domain
You're ready to validate domain, after a new certificate is requested, when certificate status is changed to 'Validate Domain'. You may select a domain on console or refer to domain validation guide via email sent to project members.
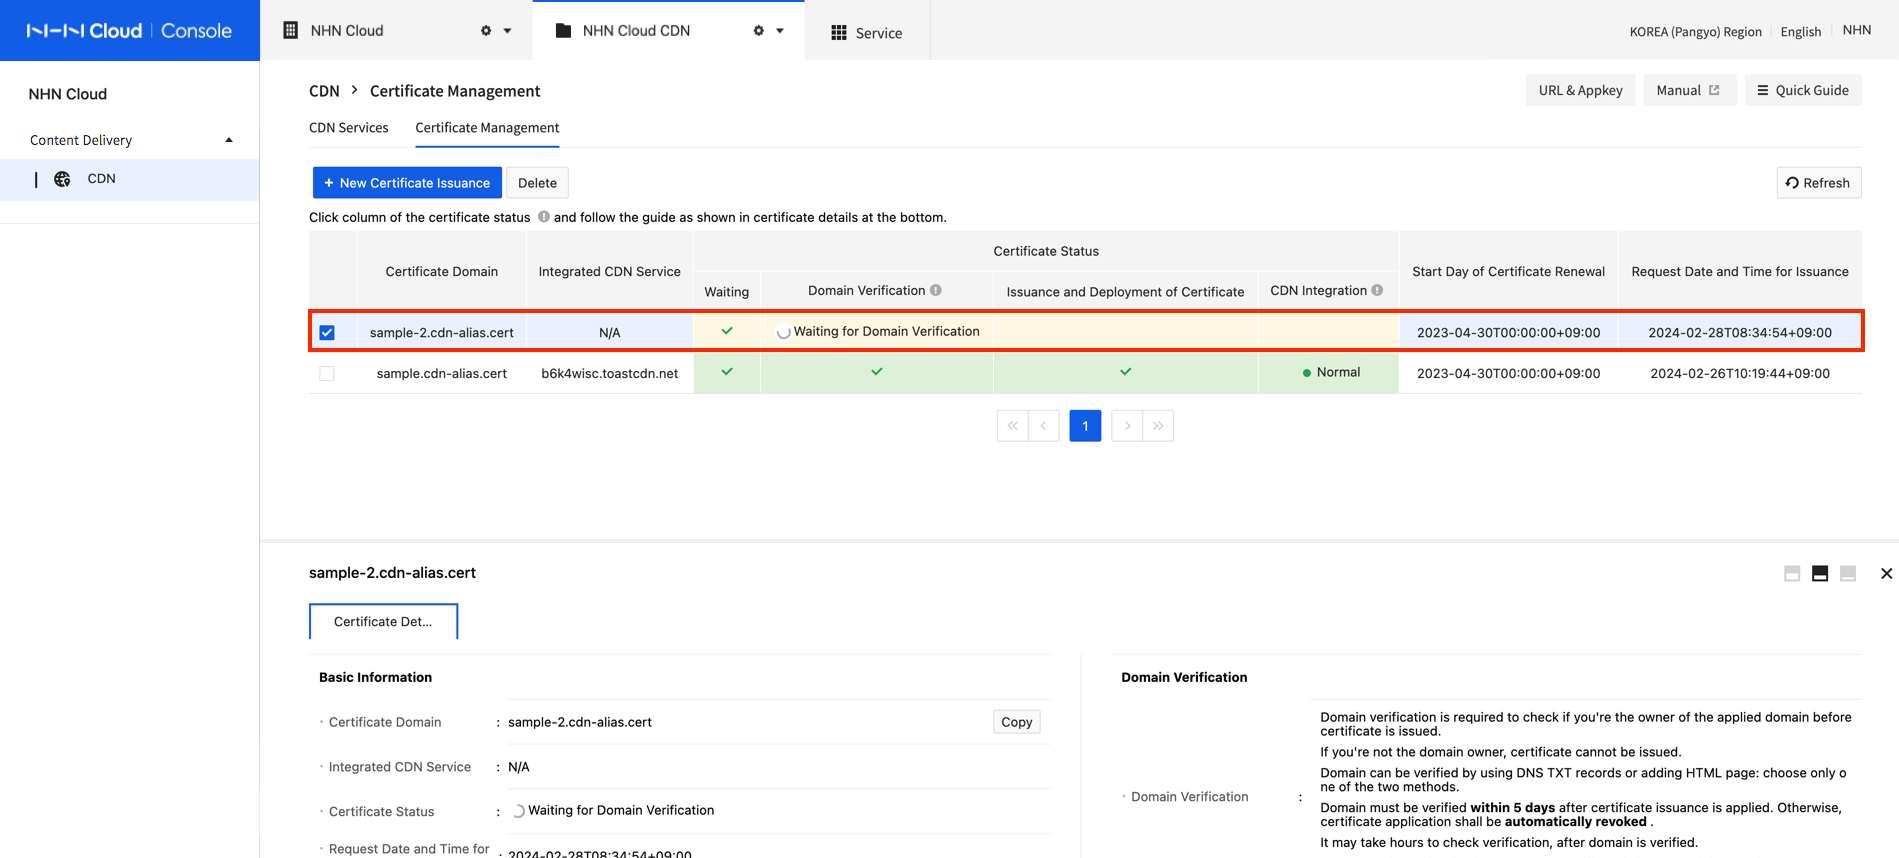
Domain validation is required to see if the requester for certificate is the actual owner of its domain. Without this process, certificate cannot be issued. As part of a domain validation method to check domain owner, domain control role must be validated. Domain validation can be carried out by Adding DNS TXT Recors or Adding HTTP Pages, and you can Choose Either of the Two Methods.
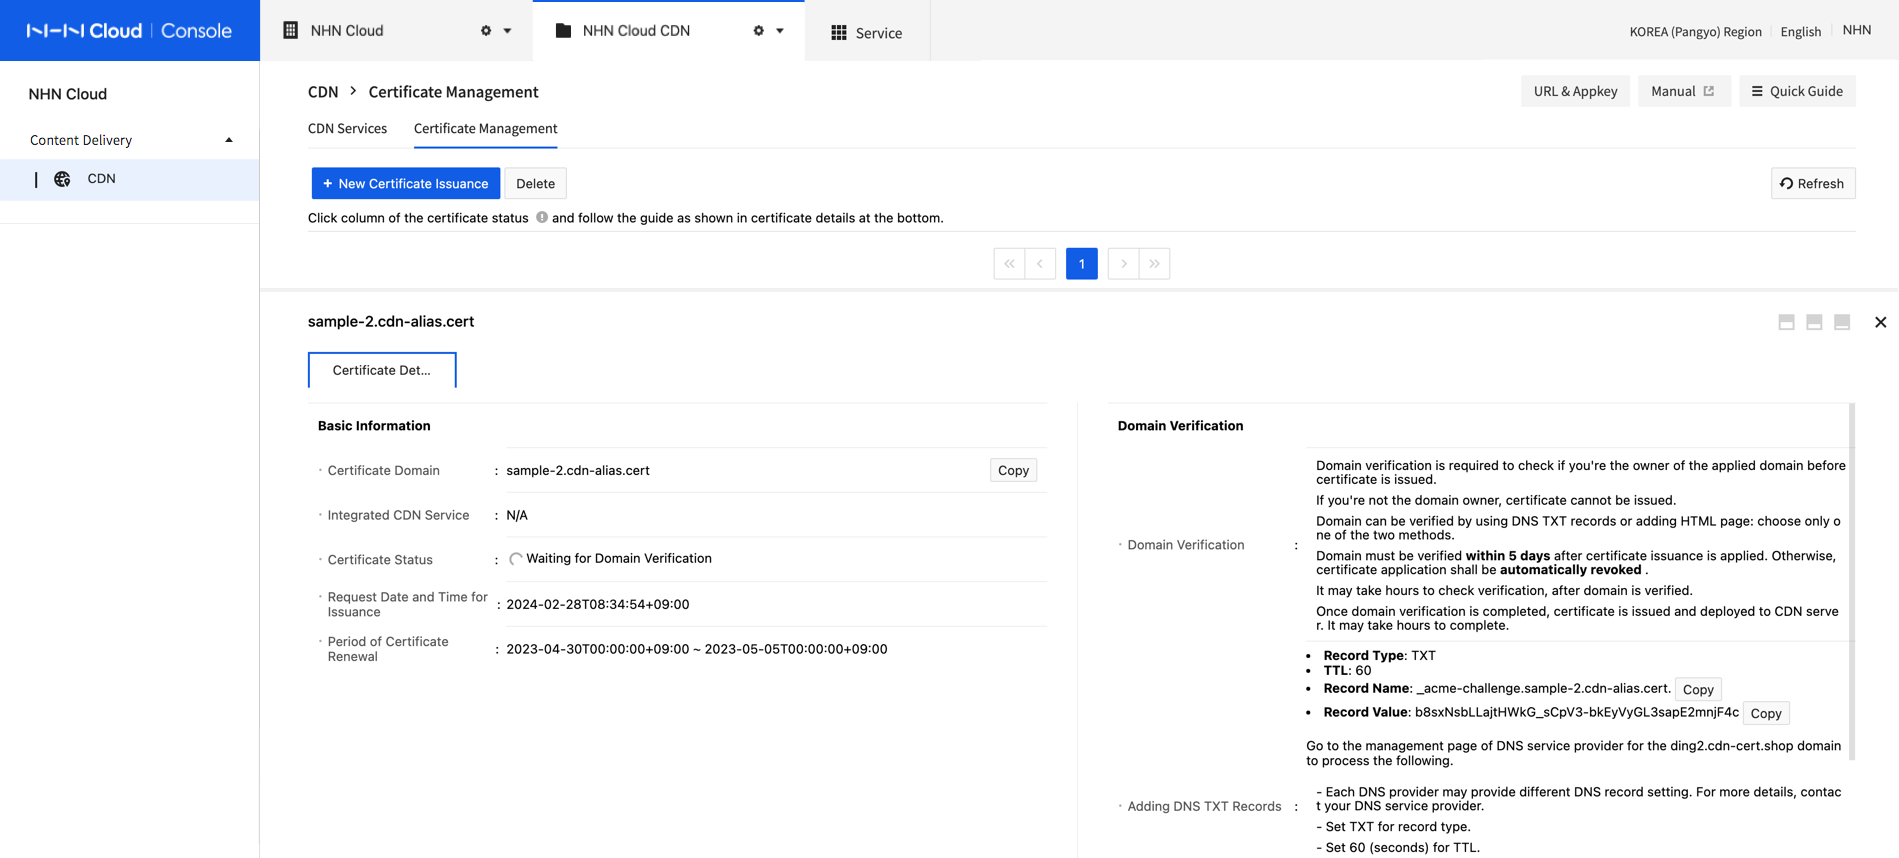
Adding DNS TXT Records
Check DNS control role of domain to validate domain.
- Add TXT record on the DNS management page of domain's DNS service provider. Each DNS service provider may provide different configuration method. Consult your service provider regarding DNS setting.
- Record Type: TXT
- TTL: 60. If 60 is unavailable, set the smallest possible number.
- Record Name: _acme-challenge.[Certificate Domain Requested of Issuance]. Fill in the Record Name of console or email guide as sent.
-
Record Value: Random Character String (fill in the Record Value of console or email guide as sent.)
-
See if TXT record, added for nslookup command, is well queried. It may take some time to query depending on the DNS transfer time.
nslookup -type=TXT _acme-challenge.[Certificate Domain Requested of Issuance].
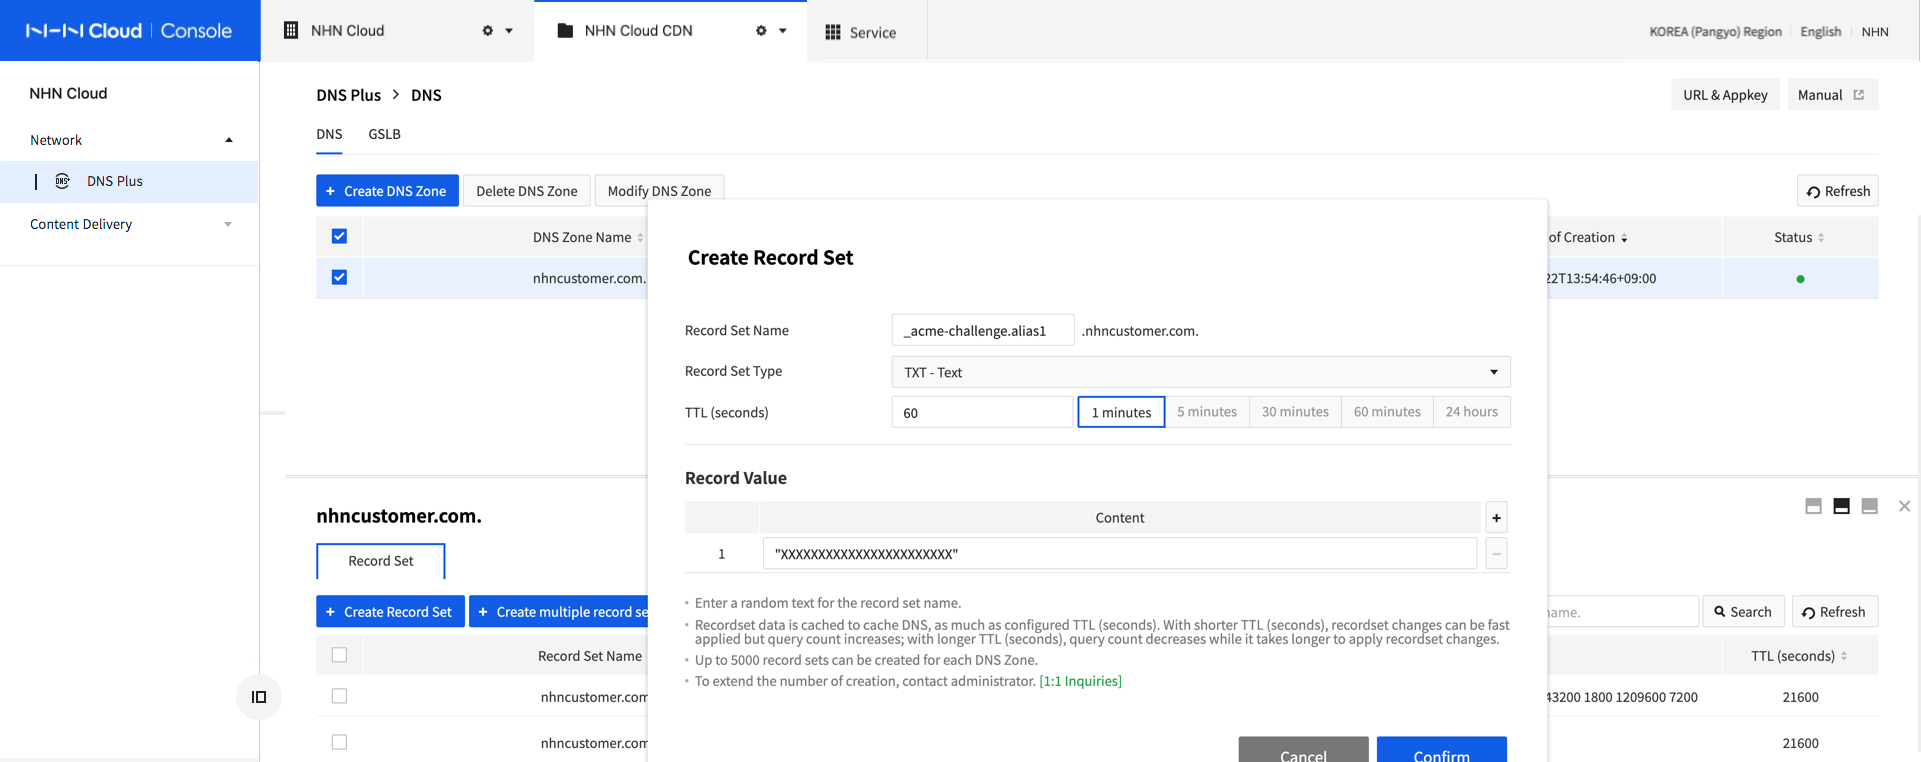
Following page shows a setting example for NHN Cloud DNS+. Each DNS provider may provide different configuration method.
Adding HTTP Pages
Add an HTTP page to a web server connected with domain to validate the domain.
- Add an HTTP page to the path of http://[Certificate Domain Requested of Issuance]/.well-known/acme-challenge/[random character string] on the web server.
- Set Page Content (Token) of console or email guide as sent for the main body of the HTTP page.
- On a web browser, access the URL of http://[Certificate Domain Requested of Issuance]/.well-known/acme-challenge/[random character string], and see if Page Content (Token) shows on the page.
[Caution] Cautions for Domain Validation 1. Domain must be validated within 5 days since when a certificate is requested of issuance. Otherwise, getting a certificate shall be automatically revoked. 2. When domain is successfully validated, certificate is to be issued and deployed within hours. Unless it proceeds more than a day, check if domain has been properly validated. If it still does not proceed, contact NHN Cloud Customer Center. 3. Adding HTTP Pages is available only when the HTTP server runs on 80 ports. If port change is unavailable, please take another option of Adding DNS TXT Records.
Issue and Deploy Certificates
Once domain is validated, a certificate shall be issued and deployed within hours. Certificate status on console shows the phase of Issue and Deploy Certificates, and notification mail is sent to project members. This phase requires no specific tasks.
[Note] Time Required to Issue and Deploy Certificates It may take up to 9 hours to issue and deploy a certificate.
Integrate with CDN Service
A certificate must be integrated with CDN service to be enabled. If this task is undone or not maintained, issued certificate may expire.
-
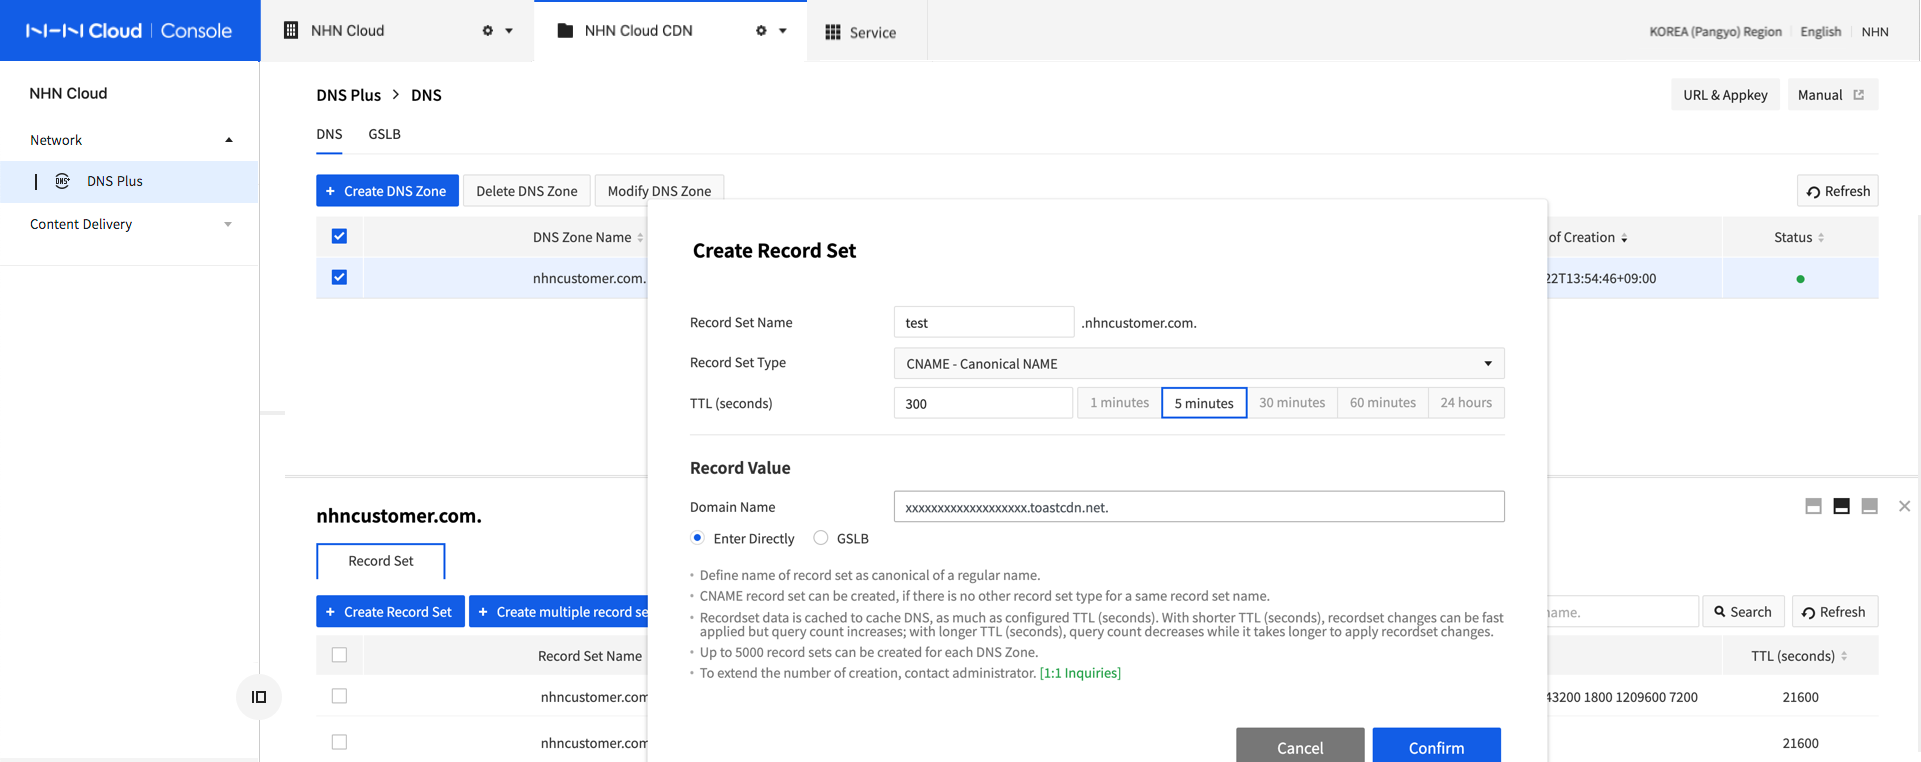
CNAME Record Setting: Add the following CNAME record to DNS management of DNS service provider of certificate domain.
- Record Type: CNAME
- TTL: Random. Small count is recommended if frequent changes are expected. When there is change in the record, it may be cached during TTL at the cache DNS server.
- Record Name: [Certificate Domain]. (Example: test.alias.com.com.)
- Record Value: [CDN Service Domain to be Integrated] (Example: xxxxxxxx.toastcdn.net)
Following page shows a setting example for NHN Cloud DNS+. Each DNS provider may provide different configuration method.
-
Domain Alias Setting: Add domain alias setting for the CDN to use certificate.
- Select CDN to be integrated from CDN Service and click Modify. Add certificate domain to domain alias and click OK.
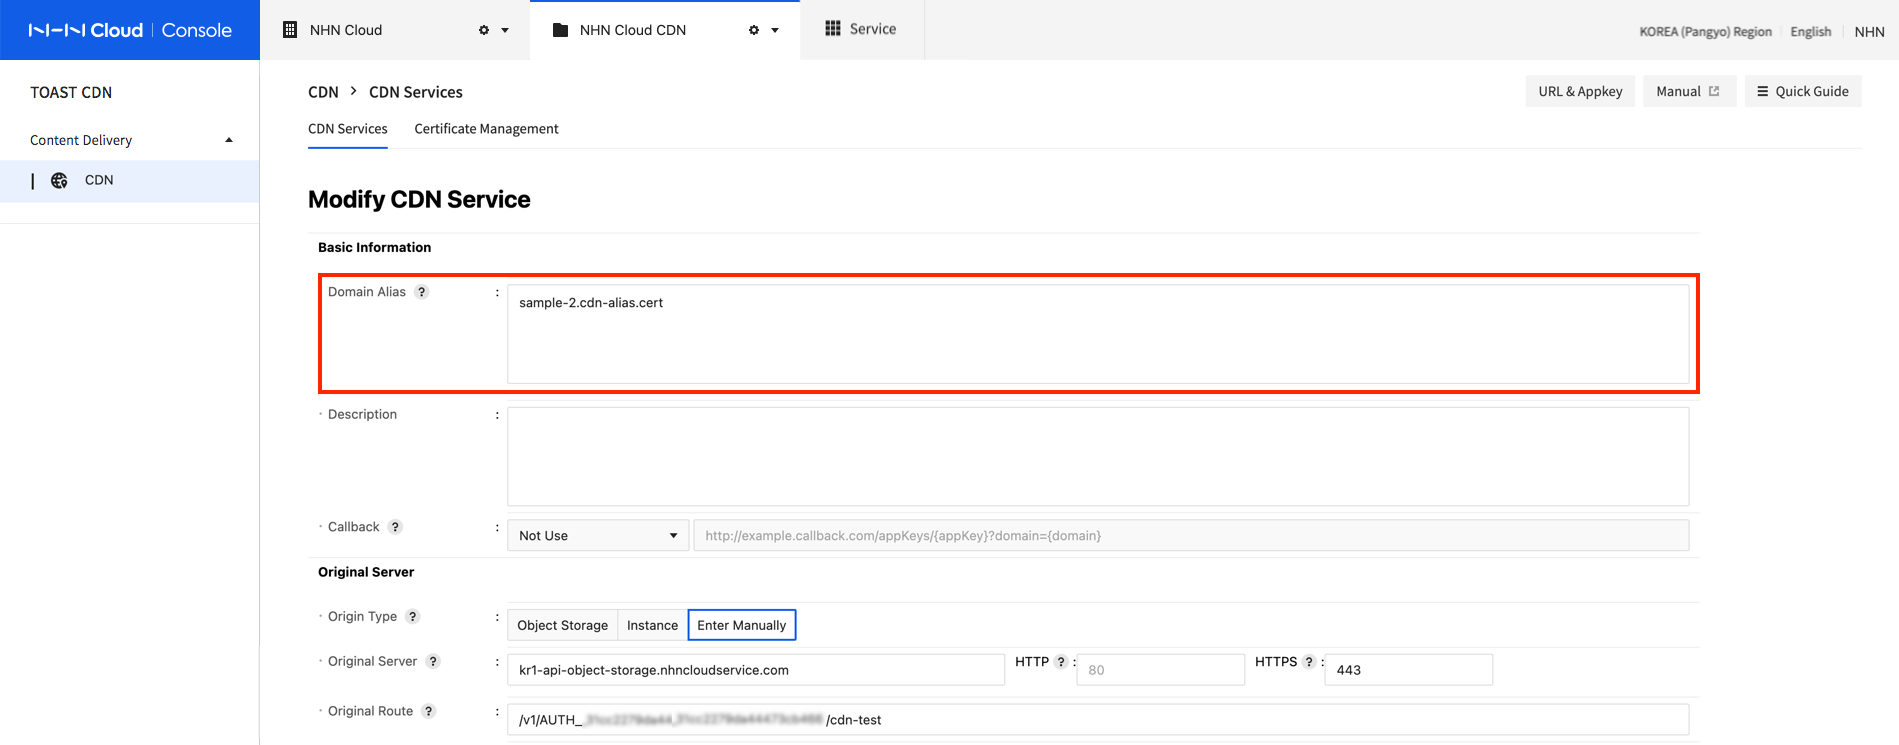
- Select CDN to be integrated from CDN Service and click Modify. Add certificate domain to domain alias and click OK.
[Note] CNAME record propagation time When setting the CNAME record, DNS propagation can take time depending on various factors. Therefore, the certificate issuance status may be displayed as [Waiting for CDN service integration] for a certain period of time even after performing the service integration process correctly. If the [Waiting for CDN service integration] status persists for more than 24 hours even though the settings are correct, please contact the NHN Cloud Customer Center.
[Caution] Caution for certificate expiration Certificates provided by NHN Cloud CDN are automatically renewed before expired. For auto-renewal, user's certificate must be integrated with CDN service. Otherwise, certificates may not be renewed during specific period and get expired. A certificate shall be renewed within 5 days after a renewal start day as indicated on the list of Certificate Management. To prevent certificates from expired, maintain the following settings at all times:
- Assign domain of a certificate to the domain address of CDN service which is to be integrated with CNAME record.
- Set certificate domain for domain alias of CDN service to be integrated with.
- When a CDN service integrated with certificate is suspended, the certificate cannot be renewed. Resume before a renewal start day or integrate it to another running CDN service.
- When a CDN service integrated with certificate is deleted, the certificate cannot be renewed: integrate it to another running CDN service before deleting.
When certificate is fully integration with CDN, the certificate status shows 'Activated'.
[Note] Measures required when an error occurs in the issued certificate IdenTrust DST Root CA x3, one of the root certificates among the certificates provided by NHN Cloud CDN, expired on September 30, 2021, and users of some older devices or browsers may experience problems. If an issue occurs due to an ERR_CERT_DATE_INVALID error on the client, refer to the following and take measures such as updating after changing the OS settings or manually installing the root certificate. 1. ISRG x1 certificate download link: Download link 2. Windows OS settings change reference guide: Link 3. Chrome browser reference guide: Link
Table of Contents
- Content Delivery > CDN > Console User Guide
- Creating CDN Service
- Basic Information
- Origin Server
- Controlling the access of root path
- Method
- Cache
- Access Management for Referer Header
- Access Control for Auth Token Authentication
- HTTP Response Header
- Settings
- Modify CDN Service Setting
- Suspend and Resume CDN
- Delete CDN
- Purge
- Statistics
- Managing Certificates
- Issue New Certificates
- Validate Domain
- Issue and Deploy Certificates
- Integrate with CDN Service